0%

深入探索单例设计模式:以百度 Apollo 为例

目录

0 前言

单例模式(Singleton Pattern)广泛应用于全局配置参数管理等应用场景,笔者近期在阅读百度 Apollo 项目过程中发现其使用了一种优雅、强泛化且线程安全的懒汉式单例实现。首先,本文给出了单例模式的设计要点,并分别实现了饿汉式单例、懒汉式单例(单检锁,双检锁 + 原子变量)、Meyers 单例;随后,以 Apollo 6.0 源码 master 分支上的最新提交 a75f30b697(截至 2021 年 7 月 19 日)为基础,详细分析了其单例模式实现;最后,对其实现方式进行了多线程安全性验证。

1 单例模式的设计要点

单例模式是一种创建型设计模式,能够保证一个类只有唯一的实例存在, 并提供一个访问该实例的全局节点,基于该特性,单例模式广泛应用于线程池管理、日志管理和全局配置参数管理等场景。

单例模式有以下三个设计要点:

(1) 提供对唯一实例的全局访问点

实例的唯一性通过在类内部将实例声明为 private static 来实现,实例访问点的全局性通过将对应方法(通常命名为 GetInstanceInstance)声明为 static 来实现。

(2) 多线程安全

单例模式的实现通常分为饿汉式单例和懒汉式单例。饿汉式单例天然地具有多线程安全性,懒汉式单例的单线程版本容易实现,多线程版本需要做些额外措施以确保多线程场景下的安全性。

(3) 防止私自创建实例

因为对单例实例的创建及获取只应通过上述的全局访问点实现,所以应防止用户私自创建实例,通常通过私有化默认构造(default),并禁止拷贝构造(copy)和拷贝赋值(assign)来实现。

2 饿汉式单例

饿汉式单例在类的加载过程中便迫不及待地(“饿”的体现)为实例指针分配了动态内存,当有多个线程尝试获取实例指针时,获得的将是同一个实体,因此饿汉式单例天然地具有多线程安全性,但也正因为实例的动态内存分配过程未考虑访问时机,因而会降低程序启动速度。下面是典型的饿汉式单例实现:

1
2
3
4
5
6
7
8
9
10
11
12
13
14
15
16
17
18
19
20
21
22
23
class HungrySingleton
{
private:
static HungrySingleton *pinstance_;

private:
HungrySingleton() {}
HungrySingleton(const HungrySingleton &) = delete;
HungrySingleton &operator=(const HungrySingleton &) = delete;

public:
~HungrySingleton() {}

public:
static HungrySingleton *GetInstance();
};

HungrySingleton *HungrySingleton::pinstance_ = new HungrySingleton;

HungrySingleton *HungrySingleton::GetInstance()
{
return pinstance_;
}

3 懒汉式单例

不同于饿汉式单例,懒汉式单例仅在初次执行获取实例的动作时才对实例进行动态内存分配(“懒”的体现),因而程序具有更高的启动速度,但无可避免地会降低初次访问实例时的效率。同时,使用懒汉式单例时需要注意多线程场景的下的安全问题。

3.1 适用于单线程场景的懒汉式单例

单线程场景下的懒汉式单例实现较为简单,将实例动态内存分配过程放到实例访问点 GetInstance 中,通过检查实例指针是否为空来判断是否是初次访问,且仅在初次访问时为实例分配内存即可:

1
2
3
4
5
6
7
8
9
10
11
12
13
14
15
16
17
18
19
20
21
22
23
24
25
26
27
class LazySingleton
{
private:
static LazySingleton *pinstance_;

private:
LazySingleton() {}
LazySingleton(const LazySingleton &) = delete;
LazySingleton &operator=(const LazySingleton &) = delete;

public:
~LazySingleton() {}

public:
static LazySingleton *GetInstance();
};

LazySingleton *LazySingleton::pinstance_{nullptr};

LazySingleton *LazySingleton::GetInstance()
{
if (nullptr == pinstance_)
{
pinstance_ = new LazySingleton;
}
return pinstance_;
}

假设实例指针尚为空时,有多个线程同时调用 GetInstance 方法,则会造成每个线程获取到各自的实例指针,违反了单例模式中的实例唯一性原则。

3.2 多线程安全的懒汉式单例:单检锁实现

可以通过在 GetInstance 方法中添加互斥锁 mutex 来解决多线程场景下的资源争抢问题,同时,为了实现自解锁,通常使用 mutex 的 RAII(Resource Acquisition Is Initialization)包装器类 std::lock_guardstd::lock_guard 是 C++11 定义于 <mutex> 中的新特性,std::lock_guard 对象可以在生命周期结束前通过析构函数自动对其所管理的 mutex 对象执行 unlock 操作。下面是典型的直接基于互斥锁的懒汉式单例实现:

1
2
3
4
5
6
7
8
9
10
11
12
13
14
15
16
17
18
19
20
21
22
23
24
25
26
27
28
29
30
class LazySingleton
{
private:
static LazySingleton *pinstance_;
static std::mutex mutex_;

private:
LazySingleton() {}
LazySingleton(const LazySingleton &) = delete;
LazySingleton &operator=(const LazySingleton &) = delete;

public:
~LazySingleton() {}

public:
static LazySingleton *GetInstance();
};

LazySingleton *LazySingleton::pinstance_{nullptr};
std::mutex LazySingleton::mutex_;

LazySingleton *LazySingleton::GetInstance()
{
std::lock_guard<std::mutex> lock(mutex_);
if (nullptr == pinstance_)
{
pinstance_ = new LazySingleton;
}
return pinstance_;
}

上面的实现方式我们通常称之为单检锁模式,即每次调用 GetInstance 方法尝试获取实例时都会执行加锁操作,并在自析构 std::lock_guard 对象时执行解锁操作,这必然会降低实例访问效率,因为如果已经为实例指针分配了内存得话,显然调用 GetInstance 时直接将实例指针返回即可,意即,只有初次调用 GetInstance 时才有必要执行锁操作。

3.3 多线程安全的懒汉式单例:双检锁 + 原子变量实现

3.3.1 使用双检锁确保性能

针对单检锁方法中存在的性能问题,有一种所谓的双检锁模式(Double-Checked Locking Pattern,DCLP)优化方案,即在 GetInstance 中执行锁操作前,在最外层额外地进行一次实例指针的检查操作(“双检”的体现),这样可以保证实例指针完成内存分配后,单纯的实例访问操作不会再附带锁操作带来的性能开销:

1
2
3
4
5
6
7
8
9
10
11
12
13
14
15
16
17
18
19
20
21
22
23
24
25
26
27
28
29
30
31
32
33
class LazySingleton
{
private:
static LazySingleton *pinstance_;
static std::mutex mutex_;

private:
LazySingleton() {}
LazySingleton(const LazySingleton &) = delete;
LazySingleton &operator=(const LazySingleton &) = delete;

public:
~LazySingleton() {}

public:
static LazySingleton *GetInstance();
};

LazySingleton *LazySingleton::pinstance_{nullptr};
std::mutex LazySingleton::mutex_;

LazySingleton *LazySingleton::GetInstance()
{
if (nullptr == pinstance_)
{
std::lock_guard<std::mutex> lock(mutex_);
if (nullptr == pinstance_)
{
pinstance_ = new LazySingleton;
}
}
return pinstance_;
}

双检锁方法初衷虽好,但却破坏了多线程场景下的安全性,这是由动态内存分配时 new 底层操作的非原子性导致的,执行 pinstance_ = new LazySingleton; 语句时,底层其实对应了三个步骤:

  1. 向系统申请分配内存,大小为 sizeof(LazySingleton)
  2. 调用 LazySingleton 的默认构造函数在申请的内存上构造出实例
  3. 返回申请内存的指针给 pinstance_

根本问题在于,上面的这三个步骤无法确保执行顺序。例如,出于优化的原因,处理器很可能调整步骤 3 和步骤 2 的执行顺序(按照 1、3、2 的顺序执行)。

假设,现在某个线程执行到了 pinstance_ = new LazySingleton; 语句,底层操作完成了内存申请(步骤 1)和实例指针赋值(步骤 3),但尚未完成申请内存的构造(步骤 2),意即,现在 pinstance_ 指向的是一片脏内存。此时,另一个线程恰好执行到双检锁的最外层检查,该线程发现 pinstance_ 非空(发生了脏读),检查为 false,因而直接取走了尚未完成构造的实例指针(return pinstance_;),从而可能诱发程序未定义行为(undefined behavior)。

3.3.2 使用原子变量确保多线程安全性

可以通过封装一个单例指针类型的 std::atomic 原子对象,将单例指针的读写操作转化为对原子对象的操作,以此来确保双检锁实现的懒汉式单例的多线程安全性。

std::atomic 是 C++11 定义于 <atomic> 中的新特性,每个 std::atomic 模板的实例化和全特化定义一个原子类型,若一个线程写入原子对象,同时另一线程从它读取,则行为良好定义。另外,对原子对象的访问可以建立线程间同步,并按 std::memory_order 枚举类型中的枚举常量对非原子内存访问定序:

1
2
3
4
5
6
7
8
typedef enum memory_order {
memory_order_relaxed,
memory_order_consume,
memory_order_acquire,
memory_order_release,
memory_order_acq_rel,
memory_order_seq_cst
} memory_order;

std::memory_order 涉及到内存模型(memory model)、内存序(memory order)、内存栅栏(memory fence)等诸多复杂概念,此处不予展开。下面给出经典的基于双检锁 + 原子变量的懒汉式单例实现:

1
2
3
4
5
6
7
8
9
10
11
12
13
14
15
16
17
18
19
20
21
22
23
24
25
26
27
28
29
30
31
32
33
34
35
36
class LazySingleton
{
private:
static std::atomic<LazySingleton *> ainstance_;
static std::mutex mutex_;

private:
LazySingleton() {}
LazySingleton(const LazySingleton &) = delete;
LazySingleton &operator=(const LazySingleton &) = delete;

public:
~LazySingleton() {}

public:
static LazySingleton *GetInstance();
};

std::atomic<LazySingleton *> LazySingleton::ainstance_;
std::mutex LazySingleton::mutex_;

LazySingleton *LazySingleton::GetInstance()
{
LazySingleton *tmp = ainstance_.load(std::memory_order_acquire);
if (nullptr == tmp)
{
std::lock_guard<std::mutex> lock(mutex_);
tmp = ainstance_.load(std::memory_order_relaxed);
if (nullptr == tmp)
{
tmp = new LazySingleton;
ainstance_.store(tmp, std::memory_order_release);
}
}
return tmp;
}

作两点说明:

  1. load 方法:原子性地加载并返回原子变量的当前值,类似读操作。唯一形参类型为 std::memory_order,默认值为 memory_order_seq_cst
  2. store 方法:根据第一实参原子性地替换原子变量的当前值,类似写操作。第二形参类型为 std::memory_order,默认值为 memory_order_seq_cst

上面这种原子变量的使用方式称为 Acquire-Release Semantic 内存模型,如果保持 loadstorestd::memory_order 参数缺省,则成为 Sequential Consistency 内存模型,性能会稍有损失。

百度 Apollo 项目中有用到双检锁 + 原子变量的懒汉式单例实现,例如 Cyber RT 框架中的调度器设计,具体实现在 apollo\cyber\scheduler\scheduler_factory.cc 中,此处不给出具体代码,本文重点在于 Apollo 中的另一种单例实现(第 5 章节)。

4 最优雅的单例:Meyers 单例

Meyers 单例是 Scott Meyers 在《Effective C++》中提出的编程范式,其实现非常优雅:

1
2
3
4
5
6
7
8
9
10
11
12
13
14
15
16
17
class MeyersSingleton
{
private:
MeyersSingleton() {};
MeyersSingleton(const MeyersSingleton &) = delete;
MeyersSingleton &operator=(const MeyersSingleton &) = delete;

public:
~MeyersSingleton();

public:
static MeyersSingleton &GetInstance()
{
static MeyersSingleton instance;
return instance;
}
};

Meyers 单例本质上也是一种懒汉式实现,但其在 C++11 及以后的标准中是天然多线程安全的,因为自 C++11 起规定

If multiple threads attempt to initialize the same static local variable concurrently, the initialization occurs exactly once (similar behavior can be obtained for arbitrary functions with std::call_once).

Note: usual implementations of this feature use variants of the double-checked locking pattern, which reduces runtime overhead for already-initialized local statics to a single non-atomic boolean comparison.

翻译过来就是,如果多个线程同时尝试初始化相同的静态局部变量,初始化动作只会发生一次,这个内部特性通常也是通过双检锁模式实现的。

笔者从事自动驾驶行业,在某功能组件的开发过程中,对其全局配置参数及车身实时状态的管理使用的也是 Meyers 单例模式。

5 百度 Apollo 中的懒汉式单例:once_flag & call_once 实现

5.1 实现分析

Apollo 中大量地应用了单例设计模式,包括上文中我们提到的双检锁 + 原子变量的懒汉式单例实现,在阅读感知模块 apollo/modules/perception/common/sensor_manager/sensor_manager.h 中的代码时发现另一种实现,一个普通的 SensorManager 类经宏定义 DECLARE_SINGLETON(SensorManager) 修饰成为单例类:

1
2
3
4
5
6
7
8
9
10
class SensorManager {

// ...
//
// other code
//
// ...

DECLARE_SINGLETON(SensorManager)
};

DECLARE_SINGLETON(classname) 定义在 apollo/cyber/common/macros.h 中:

1
2
3
4
5
6
7
8
9
10
11
12
13
14
15
16
17
18
19
20
21
22
23
24
25
26
27
28
29
30
31
32
33
34
35
36
37
38
39
40
41
42
43
44
45
46
47
48
49
50
51
52
53
54
55
56
57
58
59
#ifndef CYBER_COMMON_MACROS_H_
#define CYBER_COMMON_MACROS_H_

#include <iostream>
#include <memory>
#include <mutex>
#include <type_traits>
#include <utility>

#include "cyber/base/macros.h"

DEFINE_TYPE_TRAIT(HasShutdown, Shutdown)

template <typename T>
typename std::enable_if<HasShutdown<T>::value>::type CallShutdown(T *instance) {
instance->Shutdown();
}

template <typename T>
typename std::enable_if<!HasShutdown<T>::value>::type CallShutdown(
T *instance) {
(void)instance;
}

// There must be many copy-paste versions of these macros which are same
// things, undefine them to avoid conflict.
#undef UNUSED
#undef DISALLOW_COPY_AND_ASSIGN

#define UNUSED(param) (void)param

#define DISALLOW_COPY_AND_ASSIGN(classname) \
classname(const classname &) = delete; \
classname &operator=(const classname &) = delete;

#define DECLARE_SINGLETON(classname) \
public: \
static classname *Instance(bool create_if_needed = true) { \
static classname *instance = nullptr; \
if (!instance && create_if_needed) { \
static std::once_flag flag; \
std::call_once(flag, \
[&] { instance = new (std::nothrow) classname(); }); \
} \
return instance; \
} \
\
static void CleanUp() { \
auto instance = Instance(false); \
if (instance != nullptr) { \
CallShutdown(instance); \
} \
} \
\
private: \
classname(); \
DISALLOW_COPY_AND_ASSIGN(classname)

#endif // CYBER_COMMON_MACROS_H_

可以看到,DECLARE_SINGLETON(classname) 在预处理阶段会被替换为:

  • 静态方法 Instance
  • 私有的泛化默认构造函数和嵌套的宏定义 DISALLOW_COPY_AND_ASSIGN
  • 静态方法 CleanUp

5.1.1 泛化的单例

我们逐点分析 DECLARE_SINGLETON(classname) 是如何将任意一个类修饰为单例类的:

(1) 提供对唯一实例的全局访问点

实例的唯一性通过局部静态(local static)的实例指针实现:

1
static classname *instance = nullptr;

实例访问点的全局性通过静态方法 Instance 实现。

(2) 多线程安全

由于实例指针的动态内存分配放到了访问点中,即延迟加载,所以这是一种懒汉式单例实现。其实现方式的多线程安全性由 std::once_flagstd::call_once 保证,两者都是 C++11 定义于 <mutex> 中的新特性,配合使用可以确保多线程场景下可调用对象的唯一执行。

std::once_flagstd::call_once 的辅助结构体,在 GNU 中的实现如下:

1
2
3
4
5
6
7
8
9
10
11
12
13
14
15
16
17
18
19
struct once_flag
{
private:
typedef __gthread_once_t __native_type;
__native_type _M_once = __GTHREAD_ONCE_INIT;

public:
/// Constructor
constexpr once_flag() noexcept = default;

/// Deleted copy constructor
once_flag(const once_flag&) = delete;
/// Deleted assignment operator
once_flag& operator=(const once_flag&) = delete;

template<typename _Callable, typename... _Args>
friend void
call_once(once_flag& __once, _Callable&& __f, _Args&&... __args);
};

可以看到,call_once 被声明为 once_flag 的友元函数,为的是 call_once 可以修改 once_flag 中的 _M_once 成员(可调用对象的调用状态)。

std::call_once 是一个可变参数模板函数,其声明如下:

1
2
template<typename _Callable, typename... _Args>
void call_once(once_flag& __once, _Callable&& __f, _Args&&... __args);

可变参数经完美转发传入可调用对象,具体到 Apollo 中,可调用对象指的是为实例指针分配动态内存的 lambda 表达式:

1
[&] { instance = new (std::nothrow) classname(); }

std::call_once 通过间接调用 pthread_once 函数来确保传入的可调用对象即使在多线程场景下也只能被执行一次,pthread_once 的底层实现基于互斥锁和条件变量,此处不再展开。

(3) 防止私自创建实例

这一点通过私有化默认构造函数和另一个用于禁止拷贝构造和拷贝赋值的宏定义实现:

1
2
3
#define DISALLOW_COPY_AND_ASSIGN(classname) \
classname(const classname &) = delete; \
classname &operator=(const classname &) = delete;

到此为止已经足够将任意一个类泛化为单例类了。

5.1.2 CleanUp 方法

此处我们再稍微分析下 CleanUp 静态方法,该方法允许用户调用时执行一些自定义的清理工作(可选):

1
2
3
4
5
6
static void CleanUp() {
auto instance = Instance(false);
if (instance != nullptr) {
CallShutdown(instance);
}
}

调用 CleanUp 方法时,若发现实例指针不为空,则会调用 CallShutdown 模板函数,CallShutdown 模板函数包含两个经类型萃取(type traits)进行重载的实现:

1
2
3
4
5
6
7
8
9
10
template <typename T>
typename std::enable_if<HasShutdown<T>::value>::type CallShutdown(T *instance) {
instance->Shutdown();
}

template <typename T>
typename std::enable_if<!HasShutdown<T>::value>::type CallShutdown(
T *instance) {
(void)instance;
}

在分析 CallShutdown 前,我们需要先看下其上方的另一个宏定义:

1
DEFINE_TYPE_TRAIT(HasShutdown, Shutdown)

DEFINE_TYPE_TRAIT 定义在 apollo/cyber/base/macros.h 中:

1
2
3
4
5
6
7
8
9
10
11
12
13
14
15
16
17
#define DEFINE_TYPE_TRAIT(name, func)                     \
template <typename T> \
struct name { \
template <typename Class> \
static constexpr bool Test(decltype(&Class::func)*) { \
return true; \
} \
template <typename> \
static constexpr bool Test(...) { \
return false; \
} \
\
static constexpr bool value = Test<T>(nullptr); \
}; \
\
template <typename T> \
constexpr bool name<T>::value;

DEFINE_TYPE_TRAIT 会根据宏参数 name 创建一个同名的类型萃取模板类,并检查模板类型参数 T 中是否包含与宏参数 func 同名的方法,若包含,则模板类的 value 成员被置为 true,否则置为 false。应该注意的是,funcT 中必须是公有的,否则无法被发现。

所以 DEFINE_TYPE_TRAIT(HasShutdown, Shutdown) 的具体含义是:创建类型萃取模板类 HasShutdownHasShutdown 可检查模板类型参数 T 中是否包含 Shutdown 方法。

再回到 CallShutdown 模板函数,HasShutdown 检查实例指针所属的类类型中是否包含 Shutdown 方法,若是,则执行下面语句版本的 CallShutdown 会被 CleanUp 调用:

1
instance->Shutdown();

否则,执行下面语句版本的 CallShutdown 会被 CleanUp 调用:

1
(void)instance;

(void)instance; 没有实际含义,仅用于避免编译器生成类似“变量定义但未被使用”的警告。

5.2 封装与验证

笔者将 Apollo 中实现泛化懒汉式单例时用到的宏代码放到了一个文件中,并分别定义了不包含 Shutdown 方法的 SingletonA 类和包含 Shutdown 方法的 SingletonB 类,两个类都通过 DECLARE_SINGLETON 宏泛化成单例类:

singleton_a.hpp

1
2
3
4
5
6
7
8
9
10
11
12
13
14
15
16
17
18
19
20
21
22
23
24
25
26
27
28
29
30
31
32
33
34
35
36
#ifndef SINGLETON_A_HPP_
#define SINGLETON_A_HPP_

#include <iostream>

#include "macro.hpp"

/**
* @brief Singleton class without `Shutdown` method.
*
*/
class SingletonA
{
private:
~SingletonA() = default;

private:
static int num;

public:
static void GetNum()
{
std::cout << "\n number of instances of SingletonA: " << num << std::endl;
}

DECLARE_SINGLETON(SingletonA)
};

int SingletonA::num = 0;

SingletonA::SingletonA()
{
++num;
}

#endif

singleton_b.hpp

1
2
3
4
5
6
7
8
9
10
11
12
13
14
15
16
17
18
19
20
21
22
23
24
25
26
27
28
29
30
31
32
33
34
35
36
37
38
39
40
41
42
43
44
45
46
47
48
49
50
51
#ifndef SINGLETON_B_HPP_
#define SINGLETON_B_HPP_

#include <iostream>

#include "macro.hpp"

/**
* @brief Singleton class with `Shutdown` method.
*
*/
class SingletonB
{
private:
~SingletonB() = default;

private:
static int num;

public:
// `Shutdown` method should be declared as `public` for type traits
void Shutdown();

static void GetNum()
{
std::cout << "\n number of instances of SingletonB: " << num << std::endl;
}

DECLARE_SINGLETON(SingletonB)
};

int SingletonB::num = 0;

SingletonB::SingletonB()
{
++num;
}

void SingletonB::Shutdown()
{
auto instance = Instance(false);
if (instance != nullptr)
{
delete instance;
num = 0;
}

std::cout << "\n SingletonB::Shutdown method was called." << std::endl;
}

#endif

我们来验证下两个单例类的多线程安全性,并尝试调用各自的 CleanUp 方法:

main.cpp

1
2
3
4
5
6
7
8
9
10
11
12
13
14
15
16
17
18
19
20
21
22
23
24
25
26
27
28
29
30
31
32
33
34
35
#include <thread>

#include "singleton_a.hpp"
#include "singleton_b.hpp"

template <typename T>
void ThreadFunc()
{
std::this_thread::sleep_for(std::chrono::milliseconds(1000));
T *p = T::Instance();
}

int main()
{
std::thread tA1(ThreadFunc<SingletonA>);
std::thread tA2(ThreadFunc<SingletonA>);
std::thread tB1(ThreadFunc<SingletonB>);
std::thread tB2(ThreadFunc<SingletonB>);

tA1.join();
tA2.join();
tB1.join();
tB2.join();

SingletonA::GetNum();
SingletonB::GetNum();

SingletonA::CleanUp();
SingletonB::CleanUp();

SingletonA::GetNum();
SingletonB::GetNum();

return 0;
}

编译并运行可执行文件,得到下面的输出结果:

1
2
3
4
5
6
7
8
9
number of instances of SingletonA: 1

number of instances of SingletonB: 1

SingletonB::Shutdown method was called.

number of instances of SingletonA: 1

number of instances of SingletonB: 0

可以发现:

  • 在调用 CleanUp 方法前,虽然 SingletonASingletonB 各自被两个线程调用 Instance 方法,但默认构造均只发生了一次(实例数量均为 1),说明满足多线程安全性;
  • 分别调用 SingletonASingletonBCleanUp 方法后,SingletonB 的实例数量清零,因为其 Shutdown 方法被间接调用;SingletonA 实例数量仍为 1,因为其 CleanUp 方法什么也没做。

点击这里下载完整工程,通过 #include 工程中的 macro.hpp 头文件,我们可以将任意一个类修饰为多线程安全的单例类。

6 总结

本文首先给出了单例模式的设计要点,并分别实现了饿汉式单例、懒汉式单例(单检锁,双检锁 + 原子变量)、Meyers 单例;随后以 Apollo 6.0 源码为基础,详细分析了其单例模式实现;最后对 Apollo 的实现方式进行了线程安全性验证。

下图是几种单例实现方式的性能比较(数值越小,效率越高):

不同单例实现的性能比较

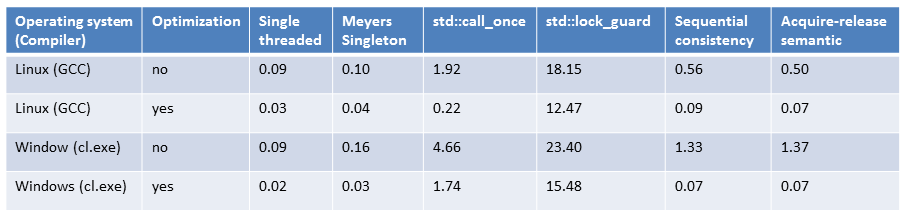
可以发现:Meyers 单例不仅形式优雅,效率在多线程场景下也是最优的;单检锁的实现方式虽然能保证多线程安全,但性能太差;call_once 的实现方式与双检锁 + 原子变量的实现方式相比,效率低了 2 ~ 3 倍,所以 Apollo 的单例实现也还有优化空间。

参考

  1. Thread-Safe Initialization of Data
  2. Thread-Safe Initialization of a Singleton
  3. Storage duration - Static local variables
  4. C++11 中的内存模型
  5. 百度 brpc 框架中文文档之 atomic_instructions
  6. Why cast an unused function parameter value to void?
  7. C++ and the Perils of Double-Checked Locking
  8. C++11 中 once_flag,call_once 实现分析
  9. Apollo 设计模式分析
  10. C++ traits 技术浅谈
  11. C++11:std::atomic

Thank you for your donate!