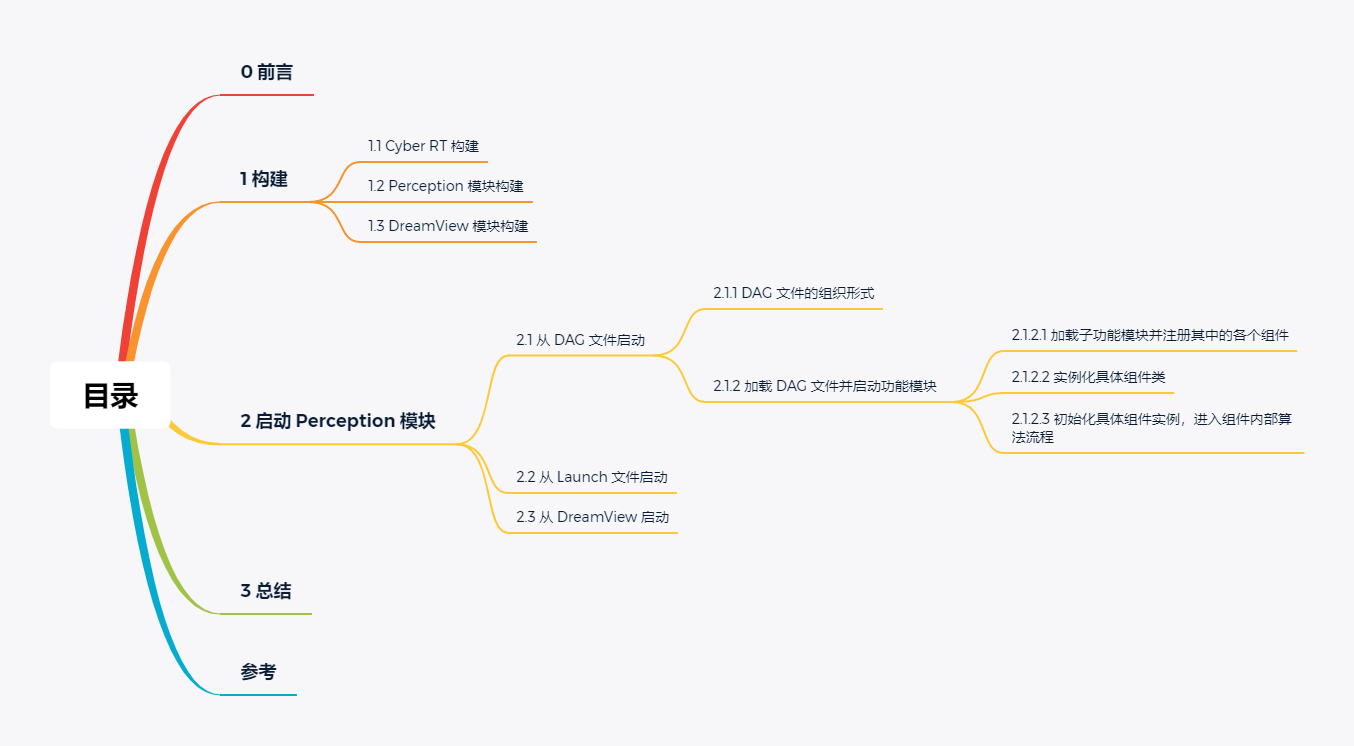
目录
0 前言 关于 Apollo Perception 模块 Fusion 组件的分析文章已经有很多了,但大多集中在从 Fusion 组件的 Init 方法和 Proc 方法开始解析组件内部的算法流程,对于 Init 和 Proc 是在何时被谁调用的却鲜有提及,至多顺便提下通过 DAG(Directed Acyclic Graph,有向无环图)文件或 Launch 文件启动模块,对于模块的具体启动流程以及模块与组件间的关系仍然模棱两可,这显然不利于对 Apollo 框架的整体把握。知其然,更要知其所以然。
本文从 Apollo Cyber RT 框架、Perception 模块、DreamView 模块的构建着手,旨在详细分析 Perception 模块及其 Fusion 组件的启动流程,并回答上文提到的 Init 和 Proc 方法的调用时机及调用对象问题。
1 构建 Apollo 使用 Bazel 进行代码构建,Bazel 是由 Google 开源的一款高效的软件构建工具。使用 Bazel 时,我们需要为每个参与构建的目录创建一个 BUILD 文件来定义一些构建规则,BUILD 文件使用类似 Python 的语法,我们看下 Apollo 代码仓库根目录下的 BUILD 文件(只列出关键部分,下同):
1
2
3
4
5
6
7
8
9
10
11
12
13
14
15
16
17
18
19
20
21
22
23
24
25
26
27
28
29
30
31
32
install( name = "install" , deps = [ "//cyber:install" , "//cyber/examples:install" , "//docker/scripts:install" , "//docs:install" , "//modules/audio:install" , "//modules/bridge:install" , "//modules/canbus:install" , "//modules/common:install" , "//modules/contrib/cyber_bridge:install" , "//modules/control:install" , "//modules/dreamview:install" , "//modules/drivers:install" , "//modules/guardian:install" , "//modules/localization:install" , "//modules/map:install" , "//modules/monitor:install" , "//modules/perception:install" , "//modules/planning:install" , "//modules/prediction:install" , "//modules/routing:install" , "//modules/storytelling:install" , "//modules/task_manager:install" , "//modules/third_party_perception:install" , "//modules/tools:install" , "//modules/transform:install" , "//modules/v2x:install" , "//scripts:install" , ], )
这里我们只关注 deps 参数中与本文有关的三个字段:
"//cyber:install""//modules/perception:install""//modules/dreamview:install"
从字面意思不难猜想到,上面三个字段分别引用了 Apollo 对应目录下其它 BUILD 文件的 Install 规则,我们依次进行说明。
1.1 Cyber RT 构建 Cyber RT 是百度开源的一款源于 ROS 的、专为自动驾驶场景而设计的高性能运行时框架,并针对自动驾驶的高并发、低延迟、高吞吐量进行了大幅优化。Cyber RT 自 Apollo 3.5 版本开始启用,此处我们不展开细节,接上文直接看下 apollo/cyber/ 目录下 BUILD 文件的主要内容:
1
2
3
4
5
6
7
8
9
10
11
12
13
14
15
16
17
install( name = "install" , data = [ ":.release.bash" , ":cyber_conf" , "//cyber/python/cyber_py3:runtime_files" , ], rename = { "cyber/.release.bash" : "setup.bash" , }, deps = [ ":pb_cyber" , "//cyber/mainboard:install" , "//cyber/python/internal:install" , "//cyber/tools:install" , ], )
根据 deps 参数中的 "//cyber/mainboard:install" 字段,我们看下 apollo/cyber/mainboard/ 目录下 BUILD 文件的主要内容:
1
2
3
4
5
6
7
8
9
10
11
12
13
14
15
16
17
18
19
20
21
cc_binary( name = "mainboard" , srcs = [ "mainboard.cc" , "module_argument.cc" , "module_argument.h" , "module_controller.cc" , "module_controller.h" , ], linkopts = ["-pthread" ], linkstatic = False , deps = [ "//cyber:cyber_core" , "//cyber/proto:dag_conf_cc_proto" , ], ) install( name = "install" , targets = [":mainboard" ], )
从 install 规则的 targets 参数我们可以知道,Cyber RT 最终会被编译成名为 mainboard 的可执行文件,从 cc_binary 规则的 srcs 参数我们又可以知道,mainboard 编译了五个文件,其中的 mainboard.cc 极有可能是主入口文件(这一点对于我们后面的分析很重要)。
1.2 Perception 模块构建 延续上面的分析思路,我们看下 apollo/modules/perception/ 目录下 BUILD 文件的主要内容:
1
2
3
4
5
6
7
8
9
install( name = "install" , deps = [ ":pb_perception" , "//modules/perception/data:install" , "//modules/perception/onboard/component:install" , "//modules/perception/production:install" , ], )
根据 deps 参数中的 "//modules/perception/onboard/component:install" 字段,我们看下 apollo/modules/perception/onboard/component/ 目录下 BUILD 文件的主要内容:
1
2
3
4
5
6
7
8
9
10
11
12
13
14
15
16
17
18
19
20
21
22
23
24
25
26
27
28
29
30
31
32
33
34
35
36
37
38
39
40
41
42
43
44
45
46
47
48
49
50
51
52
53
54
55
56
57
58
install( name = "install" , targets = [ ":libperception_component_camera.so" , ":libperception_component_lidar.so" , ], deps = [ "//cyber:install" , "//modules/perception/production:install" , ], ) cc_binary( name = "libperception_component_lidar.so" , linkshared = True , linkstatic = False , deps = [":perception_component_inner_lidar" ], ) cc_library( name = "perception_component_inner_lidar" , copts = [ '-DMODULE_NAME=\\"perception\\"' , ], deps = [ ":detection_component" , ":fusion_component" , ":radar_detection_component" , ":recognition_component" , ], alwayslink = True , ) cc_library( name = "fusion_component" , srcs = ["fusion_component.cc" ], hdrs = ["fusion_component.h" ], deps = [ "//cyber/time:clock" , "//modules/common/util:perf_util" , "//modules/perception/base" , "//modules/perception/fusion/app:obstacle_multi_sensor_fusion" , "//modules/perception/fusion/lib/dummy:dummy_algorithms" , "//modules/perception/fusion/lib/fusion_system/probabilistic_fusion" , "//modules/perception/fusion/lib/interface" , "//modules/perception/fusion/lib/interface:base_multisensor_fusion" , "//modules/perception/lib/registerer" , "//modules/perception/lidar/lib/classifier/fused_classifier" , "//modules/perception/lidar/lib/classifier/fused_classifier:ccrf_type_fusion" , "//modules/perception/map/hdmap:hdmap_input" , "//modules/perception/onboard/common_flags" , "//modules/perception/onboard/inner_component_messages" , "//modules/perception/onboard/msg_serializer" , "//modules/perception/onboard/proto:fusion_component_config_cc_proto" , "@eigen" , ], alwayslink = True , )
从 install 规则的 targets 参数我们得到一个很重要的事实:Perception 模块最终被编译成了两个分别命名为 libperception_component_camera.so 和 libperception_component_lidar.so 的动态库文件。意即,整个 Perception 功能模块被划分为 Camera 感知和 Lidar 感知。
到这里,可能会有疑问:Radar 呢?Fusion 呢?我们继续看 install 下面的规则会发现,libperception_component_lidar.so 存在下面这样的层次依赖关系:
1
2
3
4
5
6
libperception_component_lidar.so └── perception_component_inner_lidar ├── detection_component ├── fusion_component ├── radar_detection_component └── recognition_component
所以,最终 Radar 和 Fusion 等组件会被集成到 libperception_component_lidar.so 中。从 fusion_component 的 cc_library 规则我们又可以知道,Fusion 组件的入口在 fusion_component.h 和 fusion_component.cc 中,这两个文件包含了 Fusion 组件类的声明及定义。
1.3 DreamView 模块构建 我们继续看 apollo/modules/dreamview/ 目录下 BUILD 文件的主要内容:
1
2
3
4
5
6
7
8
9
10
11
12
13
14
15
16
17
18
19
20
21
22
23
cc_binary( name = "dreamview" , srcs = ["main.cc" ], copts = DREAMVIEW_COPTS + copts_if_teleop(), data = [ ":frontend" , ], deps = [ "//modules/dreamview/backend" , ], ) install( name = "install" , data = [ ":dreamview_conf" , ":frontend" , ], targets = ["dreamview" ], deps = [ "//cyber:install" , ], )
从 install 规则的 targets 参数可以知道,DreamView 模块最终会被编译成名为 dreamview 的可执行文件;从 cc_binary 规则的 srcs 参数又可以知道,dreamview 可执行文件的入口在 main.cc 中。
2 启动 Perception 模块 2.1 从 DAG 文件启动 2.1.1 DAG 文件的组织形式 DAG 文件是模块拓扑关系的配置文件,可以在 DAG 文件中定义各模块所使用的组件,及各组件对应的配置文件路径、上游/下游通道(channel)等信息。例如,Perception 模块对应的 DAG 文件为 apollo/modules/perception/production/dag/dag_streaming_perception.dag,我们看下其包含的具体内容:
1
2
3
4
5
6
7
8
9
10
11
12
13
14
15
16
17
18
19
20
21
22
23
24
25
26
27
28
29
30
31
32
33
34
35
36
37
38
39
40
41
42
43
44
45
46
47
48
49
50
51
52
53
54
55
56
57
58
59
60
61
62
63
64
65
66
67
68
69
70
71
72
73
74
75
76
77
78
79
80
81
82
83
84
85
86
87
88
89
90
module_config { module_library : "/apollo/bazel-bin/modules/perception/onboard/component/libperception_component_camera.so" components { class_name : "FusionCameraDetectionComponent" config { name: "FusionCameraComponent" config_file_path: "/apollo/modules/perception/production/conf/perception/camera/fusion_camera_detection_component.pb.txt" flag_file_path: "/apollo/modules/perception/production/conf/perception/perception_common.flag" } } } module_config { module_library : "/apollo/bazel-bin/modules/perception/onboard/component/libperception_component_lidar.so" components { class_name : "DetectionComponent" config { name: "Velodyne128Detection" config_file_path: "/apollo/modules/perception/production/conf/perception/lidar/velodyne128_detection_conf.pb.txt" flag_file_path: "/apollo/modules/perception/production/conf/perception/perception_common.flag" readers { channel: "/apollo/sensor/lidar128/compensator/PointCloud2" } } } components { class_name : "RecognitionComponent" config { name: "RecognitionComponent" config_file_path: "/apollo/modules/perception/production/conf/perception/lidar/recognition_conf.pb.txt" readers { channel: "/perception/inner/DetectionObjects" } } } components { class_name: "RadarDetectionComponent" config { name: "FrontRadarDetection" config_file_path: "/apollo/modules/perception/production/conf/perception/radar/front_radar_component_conf.pb.txt" flag_file_path: "/apollo/modules/perception/production/conf/perception/perception_common.flag" readers { channel: "/apollo/sensor/radar/front" } } } components { class_name: "RadarDetectionComponent" config { name: "RearRadarDetection" config_file_path: "/apollo/modules/perception/production/conf/perception/radar/rear_radar_component_conf.pb.txt" flag_file_path: "/apollo/modules/perception/production/conf/perception/perception_common.flag" readers { channel: "/apollo/sensor/radar/rear" } } } components { class_name: "FusionComponent" config { name: "SensorFusion" config_file_path: "/apollo/modules/perception/production/conf/perception/fusion/fusion_component_conf.pb.txt" readers { channel: "/perception/inner/PrefusedObjects" } } } } module_config { module_library : "/apollo/bazel-bin/modules/v2x/fusion/apps/libv2x_fusion_component.so" components { class_name : "V2XFusionComponent" config { name : "v2x_fusion" flag_file_path : "/apollo/modules/v2x/conf/v2x_fusion_tracker.conf" readers: [ { channel: "/perception/vehicle/obstacles" } ] } } }
上面这个 DAG 文件虽然冗长,但分析起来很简单,它包含了三个子功能模块:
libperception_component_camera.solibperception_component_lidar.solibv2x_fusion_component.so
我们着重看所关心的 Lidar 部分,libperception_component_lidar.so 子功能模块下包含了四类组件及各自对应的配置文件路径和输入 channel:
DetectionComponentRecognitionComponentRadarDetectionComponentFusionComponent
如果细心得话可以发现,RadarDetectionComponent 被包含了两次,这其实表示得是 RadarDetectionComponent 组件类会被创建两个实例,一个用于处理前毫米波雷达数据,另一个用于处理后毫米波雷达数据。
2.1.2 加载 DAG 文件并启动功能模块 所有的功能模块都在 Cyber RT 框架下进行任务调度和通信,上文中我们已经提到,Cyber RT 最终会被编译成名为 mainboard 的可执行文件,我们可以在 Apollo 源码仓库的根目录下执行下述命令来加载上述的 DAG 文件并启动其中包含的子功能模块与组件:
1 mainboard -d modules/perception/production/dag/dag_streaming_perception.dag
-d 选项后面跟的是 DAG 文件路径,我们可以像下面这样为 mainboard 传入多个 DAG 文件,mainboard 会循环处理每个 DAG 文件:
1 mainboard -d a.dag -d b.dag -d c.dag
mainboard 还有两个参数选项:
-p:进程所在命名空间-s:进程所使用的调度策略
那 mainboard 具体是如何启动的 DAG 文件中包含的子功能模块与相应组件的呢?根据 1.1 章节中的结论,我们打开 apollo/cyber/mainboard/mainboard.cc 文件,发现其中包含了 mainboard 的 main 入口函数:
1
2
3
4
5
6
7
8
9
10
11
12
13
14
15
16
17
18
19
20
21
22
int main (int argc, char ** argv) ModuleArgument module_args; module_args.ParseArgument(argc, argv); apollo::cyber::Init(argv[0 ]); ModuleController controller (module_args) ; if (!controller.Init()) { controller.Clear(); AERROR << "module start error." ; return -1 ; } apollo::cyber::WaitForShutdown(); controller.Clear(); AINFO << "exit mainboard." ; return 0 ; }
该入口函数主要做了三件事:
解析传入参数
初始化 Cyber RT
实例化模块控制器类(ModuleController),并进行初始化
我们进入模块控制器初始化方法 ModuleController::Init:
1 inline bool ModuleController::Init () return LoadAll(); }
ModuleController::Init 会间接调用 ModuleController::LoadAll,LoadAll 的核心任务是循环处理我们为 mainboard 传入的每个 DAG 文件,并针对每个 DAG 文件最终调用 ModuleController::LoadModule 方法:
1
2
3
4
5
6
7
8
9
10
11
12
13
14
15
16
17
18
19
20
21
22
23
24
25
26
27
28
29
30
31
32
33
34
35
36
37
38
39
40
41
bool ModuleController::LoadModule (const DagConfig& dag_config) const std ::string work_root = common::WorkRoot(); for (auto module_config : dag_config.module_config()) { std ::string load_path; if (module_config.module_library().front() == '/' ) { load_path = module_config.module_library(); } else { load_path = common::GetAbsolutePath(work_root, module_config.module_library()); } if (!common::PathExists(load_path)) { AERROR << "Path does not exist: " << load_path; return false ; } class_loader_manager_.LoadLibrary(load_path); for (auto & component : module_config.components()) { const std ::string & class_name = component.class_name(); std ::shared_ptr <ComponentBase> base = class_loader_manager_.CreateClassObj<ComponentBase>(class_name); if (base == nullptr || !base->Initialize(component.config())) { return false ; } component_list_.emplace_back(std ::move(base)); } for (auto & component : module_config.timer_components()) { const std ::string & class_name = component.class_name(); std ::shared_ptr <ComponentBase> base = class_loader_manager_.CreateClassObj<ComponentBase>(class_name); if (base == nullptr || !base->Initialize(component.config())) { return false ; } component_list_.emplace_back(std ::move(base)); } } return true ; }
ModuleController::LoadModule 方法并不复杂,其主要做了三件事,下面我们依次展开。
2.1.2.1 加载子功能模块并注册其中的各个组件 ModuleController::LoadModule 方法通过 ClassLoaderManager::LoadLibrary 方法间接调用 Linux 底层的 dlopen 函数来加载 DAG 文件中各个子功能模块的 .so 动态库文件,具体细节不再展开。
每个子功能模块的组件注册过程是随着模块 .so 动态库文件的加载一同进行的,以 Fusion 组件为例,为分析其注册过程我们需要先看下对应组件类的定义。如上文所述,Fusion 组件的入口在 fusion_component.h 中,我们打开 apollo/modules/perception/onboard/component/fusion_component.h 一探究竟:
1
2
3
4
5
6
7
8
9
10
11
12
13
14
15
16
17
18
19
20
21
22
23
24
25
26
27
28
29
30
class FusionComponent :public cyber::Component<SensorFrameMessage> { public : FusionComponent() = default ; ~FusionComponent() = default ; bool Init () override bool Proc (const std ::shared_ptr <SensorFrameMessage>& message) override private : bool InitAlgorithmPlugin () bool InternalProc (const std ::shared_ptr <SensorFrameMessage const >& in_message, std ::shared_ptr <PerceptionObstacles> out_message, std ::shared_ptr <SensorFrameMessage> viz_message) private : static std ::mutex s_mutex_; static uint32_t s_seq_num_; std ::string fusion_name_; std ::string fusion_method_; std ::vector <std ::string > fusion_main_sensors_; bool object_in_roi_check_ = false ; double radius_for_roi_object_check_ = 0 ; std ::unique_ptr <fusion::BaseMultiSensorFusion> fusion_; map ::HDMapInput* hdmap_input_ = nullptr ; std ::shared_ptr <apollo::cyber::Writer<PerceptionObstacles>> writer_; std ::shared_ptr <apollo::cyber::Writer<SensorFrameMessage>> inner_writer_; }; CYBER_REGISTER_COMPONENT(FusionComponent);
望文生义,最下面的 CYBER_REGISTER_COMPONENT 宏就是用于组件注册的,我们层层递进,看看最后发生了什么:
1 CYBER_REGISTER_COMPONENT(FusionComponent);
1 2 #define CYBER_REGISTER_COMPONENT(name) \ CLASS_LOADER_REGISTER_CLASS(name, apollo::cyber::ComponentBase)
1 2 #define CLASS_LOADER_REGISTER_CLASS(Derived, Base) \ CLASS_LOADER_REGISTER_CLASS_INTERNAL_1(Derived, Base, __COUNTER__)
1 2 #define CLASS_LOADER_REGISTER_CLASS_INTERNAL_1(Derived, Base, UniqueID) \ CLASS_LOADER_REGISTER_CLASS_INTERNAL(Derived, Base, UniqueID)
1 2 3 4 5 6 7 8 9 10 #define CLASS_LOADER_REGISTER_CLASS_INTERNAL(Derived, Base, UniqueID) \ namespace { \ struct ProxyType ##UniqueID { ProxyType##UniqueID() { \ apollo::cyber::class_loader::utility::RegisterClass<Derived, Base>( \ #Derived, #Base); \ } \ }; \ static ProxyType##UniqueID g_register_class_##UniqueID; \ }
1
2
3
4
5
6
7
8
9
10
11
12
13
14
15
16
17
template <typename Derived, typename Base>void RegisterClass (const std ::string & class_name, const std ::string & base_class_name) AINFO << "registerclass:" << class_name << "," << base_class_name << "," << GetCurLoadingLibraryName(); utility::AbstractClassFactory<Base>* new_class_factory_obj = new utility::ClassFactory<Derived, Base>(class_name, base_class_name); new_class_factory_obj->AddOwnedClassLoader(GetCurActiveClassLoader()); new_class_factory_obj->SetRelativeLibraryPath(GetCurLoadingLibraryName()); GetClassFactoryMapMapMutex().lock(); ClassClassFactoryMap& factory_map = GetClassFactoryMapByBaseClass(typeid (Base).name()); factory_map[class_name] = new_class_factory_obj; GetClassFactoryMapMapMutex().unlock(); }
将 FusionComponent 和 apollo::cyber::ComponentBase 代入模板函数 RegisterClass,其内部将使用工厂方法模式为 FusionComponent 组件类创建对应的类工厂对象,并为类工厂对象添加类加载器,设置动态库路径,最后将 FusionComponent 及其类工厂对象的映射关系添加到 factory_map 中。后续 FusionComponent 的实例化步骤将依赖 factory_map 中的注册结果。
2.1.2.2 实例化具体组件类 我们跳回到前面的 ModuleController::LoadModule 方法,找到其中循环处理子功能模块中每个组件的代码段:
1
2
3
4
5
6
7
8
9
for (auto & component : module_config.components()) { const std ::string & class_name = component.class_name(); std ::shared_ptr <ComponentBase> base = class_loader_manager_.CreateClassObj<ComponentBase>(class_name); if (base == nullptr || !base->Initialize(component.config())) { return false ; } component_list_.emplace_back(std ::move(base)); }
我们将 FusionComponent 作为一次轮询代入上面这个 for 循环,其中下面的语句完成了组件类的实例化:
1
2
std ::shared_ptr <ComponentBase> base = class_loader_manager_.CreateClassObj<ComponentBase>(FusionComponent);
CreateClassObj 方法的实现并不复杂,细节不再展开,其最后主要是在上文组件注册过程中提及的 factory_map 中查找 FusionComponent 对应的类工厂对象,并通过该类工厂对象最终向 base 返回一个 FusionComponent 指针。看到这里应该可以发现,base 的静态类型是一个指向 ComponentBase 的共享智能指针,但却动态绑定到了一个派生类对象上,这意味着后面很有可能会发生多态调用。
2.1.2.3 初始化具体组件实例,进入组件内部算法流程 第一次多态调用
完成 Fusion 组件类 FusionComponent 的实例化后,紧接着调用了 base 的 Initialize 方法,Initialize 是 FusionComponent 的间接基类 ComponentBase 中的 virtual 函数,此时会按照继承体系多态调用 FusionComponent 直接基类 Component<SensorFrameMessage>(只接受一个消息类型参数的 Component 类)中的版本:
1
2
3
4
5
6
7
8
9
10
11
12
13
14
15
16
17
18
19
20
21
22
23
24
25
26
27
28
29
30
31
32
33
34
35
36
37
38
39
40
41
42
43
44
45
46
47
48
49
50
51
52
53
54
55
56
57
58
59
60
template <typename M0>bool Component<M0, NullType, NullType, NullType>::Initialize( const ComponentConfig& config) { node_.reset(new Node(config.name())); LoadConfigFiles(config); if (config.readers_size() < 1 ) { AERROR << "Invalid config file: too few readers." ; return false ; } if (!Init()) { AERROR << "Component Init() failed." ; return false ; } bool is_reality_mode = GlobalData::Instance()->IsRealityMode(); ReaderConfig reader_cfg; reader_cfg.channel_name = config.readers(0 ).channel(); reader_cfg.qos_profile.CopyFrom(config.readers(0 ).qos_profile()); reader_cfg.pending_queue_size = config.readers(0 ).pending_queue_size(); std ::weak_ptr<Component<M0>> self = std ::dynamic_pointer_cast<Component<M0>>(shared_from_this()); auto func = [self](const std ::shared_ptr <M0>& msg) { auto ptr = self.lock(); if (ptr) { ptr->Process(msg); } else { AERROR << "Component object has been destroyed." ; } }; std ::shared_ptr <Reader<M0>> reader = nullptr ; if (cyber_likely(is_reality_mode)) { reader = node_->CreateReader<M0>(reader_cfg); } else { reader = node_->CreateReader<M0>(reader_cfg, func); } if (reader == nullptr ) { AERROR << "Component create reader failed." ; return false ; } readers_.emplace_back(std ::move(reader)); if (cyber_unlikely(!is_reality_mode)) { return true ; } data::VisitorConfig conf = {readers_[0 ]->ChannelId(), readers_[0 ]->PendingQueueSize()}; auto dv = std ::make_shared<data::DataVisitor<M0>>(conf); croutine::RoutineFactory factory = croutine::CreateRoutineFactory<M0>(func, dv); auto sched = scheduler::Instance(); return sched->CreateTask(factory, node_->Name()); }
第二次多态调用
Initialize 方法首先会创建一个与 DAG 文件中 FusionComponent 的 config.name 参数(SensorFusion)同名的节点,然后会调用 Init 方法,这是 ComponentBase 中的一个 pure virtual 函数,且 ComponentBase 的直接派生类 Component 未对 Init 进行重写,所以最终会按照继承体系多态调用 ComponentBase 间接派生类 FusionComponent 中的版本,至此,Fusion 组件的初始化完成了!
第三次多态调用
Initialize 方法后面又会创建一个 lambda 函数对象 func,func 中会调用 Component 类的 Process 方法,
1
2
3
4
5
6
7
8
template <typename M0>bool Component<M0, NullType, NullType, NullType>::Process( const std ::shared_ptr <M0>& msg) { if (is_shutdown_.load()) { return true ; } return Proc(msg); }
Process 方法中调用的 Proc 方法是 Component 类的一个 pure virtual 函数,因此会按照继承体系多态调用 Component 派生类 FusionComponent 中的版本,但 func 对象最终又是在哪里被调用的呢?继续看 Initialize 方法后面的代码不难发现,func 的调用流程是这样的:
1
2
3
4
5
6
7
8
9
创建协程工厂,并将 func 对象绑定到该协程工厂 --> 为 Initialize 方法最开始创建的 SensorFusion 节点创建调度任务 --> 使用协程工厂创建协程,并将其分配给调度任务 --> 分发调度任务 --> 组件对应 channel 上的消息回调触发调度器进行任务调度
最终,FusionComponent 中的 Proc 方法将成为对应 channel 上消息的回调函数。至此,进入了 Fusion 组件的内部算法流程!文章最开始的问题得到圆满解答。同时,根据上面的分析过程,我们还可以得出一个拓展结论:每个组件最终会分别对应一个协程 。
2.2 从 Launch 文件启动 Launch 文件只是对 DAG 文件进行了又一次封装,方便我们更灵活地组织工作。Perception 模块对应的 Launch 文件为 apollo/modules/perception/production/launch/perception.launch,我们看下其包含的具体内容:
1 2 3 4 5 6 7 8 9 10 11 12 13 14 15 16 17 18 19 20 21 22 23 24 25 <cyber > <desc > cyber modules list config</desc > <version > 1.0.0</version > <module > <name > perception_lidar</name > <dag_conf > /apollo/modules/perception/production/dag/dag_streaming_perception.dag</dag_conf > <process_name > perception_lidar</process_name > <version > 1.0.0</version > </module > <module > <name > motion_service</name > <dag_conf > /apollo/modules/perception/production/dag/dag_motion_service.dag</dag_conf > <process_name > motion_service</process_name > <version > 1.0.0</version > </module > </cyber >
其中:
module 字段用于区分不同的模块name 字段表示模块名称dag_conf 字段为对应的 DAG 文件路径process_name 字段表示为模块开辟的进程名
我们可以在 Apollo 源码仓库的根目录下执行下述命令来加载上述 Launch 文件并启动其中包含的 DAG 文件中的子功能模块和相关组件:
1 cyber_launch start modules/perception/production/launch/perception.launch
cyber_launch 其实对应的是一个 Python 脚本 apollo/cyber/tools/cyber_launch/cyber_launch.py,上述语句最终会通过调用 Python subprocess 库的 Popen 函数为 Launch 文件中的每个 DAG 文件创建一个独立线程,并像 2.1 章节中描述的那样执行对应的 mainboard 启动语句,此处不再赘述。
2.3 从 DreamView 启动 在此前的文章《Apollo 6.0 安装完全指南》 中我们已经知道,通过下面的命令行我们可以启动 DreamView GUI 界面:
1 ./scripts/bootstrap.sh start
在 GUI 界面上我们可以进行各种操作,无需通过前文介绍的 mainboard 或 cyber_launch 的方式单独启动模块,这是怎么做到的呢?如果我们打开 apollo/scripts/bootstrap.sh,并层层递进,会发现最终调用了 apollo/scripts/apollo_base.sh 中的 start_customized_path 函数:
1
2
3
4
5
6
7
8
9
10
11
12
13
14
15
16
17
18
19
20
21
22
function start_customized_path MODULE_PATH=$1 MODULE=$2 shift 2 is_stopped_customized_path "${MODULE_PATH} " "${MODULE} " if [ $? -eq 1 ]; then eval "nohup cyber_launch start ${APOLLO_ROOT_DIR} /modules/${MODULE_PATH} /launch/${MODULE} .launch &" sleep 0.5 is_stopped_customized_path "${MODULE_PATH} " "${MODULE} " if [ $? -eq 0 ]; then ok "Launched module ${MODULE} ." return 0 else error "Could not launch module ${MODULE} . Is it already built?" return 1 fi else info "Module ${MODULE} is already running - skipping." return 2 fi }
关键的是其中的 eval 这条语句,我们显示地给出语句中的变量值,则最终下面这条语句会被执行:
1 nohup cyber_launch start apollo/modules/dream/launch/dream.launch &
这条语句表示无挂断地(nohup)在后台(&)执行 cyber_launch 脚本,命令参数是 start 和 apollo/modules/dream/launch/dream.launch,我们看下 Launch 文件中的内容:
1 2 3 4 5 6 7 8 9 10 11 <cyber > <module > <name > dreamview</name > <dag_conf > </dag_conf > <type > binary</type > <process_name > /apollo/bazel-bin/modules/dreamview/dreamview --flagfile=/apollo/modules/common/data/global_flagfile.txt </process_name > <exception_handler > respawn</exception_handler > </module > </cyber >
由于 type 属性为 binary,cyber_launch 脚本直接调用 Python subprocess 库的 Popen 函数来执行下面的语句:
1 /apollo/bazel-bin/modules/dreamview/dreamview --flagfile=/apollo/modules/common/data/global_flagfile.txt
前文曾提到,DreamView 模块最终会被编译成名为 dreamview 的可执行文件,所以上面的语句会启动 dreamview 程序,我们打开 apollo/modules/dreamview/main.cc 文件,看下 dreamview 的 main 入口函数:
1
2
3
4
5
6
7
8
9
10
11
12
13
14
15
int main (int argc, char *argv[]) google::ParseCommandLineFlags(&argc, &argv, true ); apollo::cyber::GlobalData::Instance()->SetProcessGroup("dreamview_sched" ); apollo::cyber::Init(argv[0 ]); apollo::dreamview::Dreamview dreamview; const bool init_success = dreamview.Init().ok() && dreamview.Start().ok(); if (!init_success) { AERROR << "Failed to initialize dreamview server" ; return -1 ; } apollo::cyber::WaitForShutdown(); return 0 ; }
该入口函数主要做了三件事:
解析传入参数
初始化 Cyber RT
实例化 Dreamview 类,并进行初始化和启动
这里我们只需要关注 Dreamview::Init 方法内部间接发生的两个事实:
1. 加载 HMI 模式
在《Apollo 6.0 安装完全指南》 中我们提到,需要在 DreamView 界面的对应下拉框中选择驾驶模式为“Mkz Standard Debug”,这里的驾驶模式其实对应了 apollo/modules/dreamview/conf/hmi_modes/mkz_standard_debug.pb.txt 模式配置文件,该文件描述了“Mkz Standard Debug”驾驶模式下需要启动哪些功能模块,我们看下其中与 Perception 模块对应的字段:
1
2
3
4
5
6
cyber_modules { key: "Perception" value: { dag_files: "/apollo/modules/perception/production/dag/dag_streaming_perception.dag" } }
cyber_modules 表示功能模组,是比功能模块更大一级的概念,一个 cyber_modules 可以包含多个功能模块;key 表示 cyber_modules 的名称;value 包含 cyber_modules 依赖的所有 DAG 文件与 cyber_modules 所在的进程组 process_group(此处未显式给出,为空)。Dreamview::Init 方法间接调用 apollo/modules/dreamview/backend/hmi/hmi_worker.cc 中的 HMIWorker::LoadMode 方法来处理模式配置文件:
1
2
3
4
5
6
7
8
9
10
11
12
13
14
15
16
17
18
19
20
21
22
23
24
25
26
27
28
29
30
31
32
33
34
35
36
37
38
39
HMIMode HMIWorker::LoadMode (const std ::string & mode_config_path) { HMIMode mode; ACHECK(cyber::common::GetProtoFromFile(mode_config_path, &mode)) << "Unable to parse HMIMode from file " << mode_config_path; for (const auto & iter : mode.cyber_modules()) { const std ::string & module_name = iter.first; const CyberModule& cyber_module = iter.second; ACHECK(!cyber_module.dag_files().empty()) << "None dag file is provided for " << module_name << " module in " << mode_config_path; Module& module = LookupOrInsert(mode.mutable_modules(), module_name, {}); module .set_required_for_safety(cyber_module.required_for_safety()); module .set_start_command("nohup mainboard" ); const auto & process_group = cyber_module.process_group(); if (!process_group.empty()) { absl::StrAppend(module .mutable_start_command(), " -p " , process_group); } for (const std ::string & dag : cyber_module.dag_files()) { absl::StrAppend(module .mutable_start_command(), " -d " , dag); } absl::StrAppend(module .mutable_start_command(), " &" ); const std ::string & first_dag = cyber_module.dag_files(0 ); module .set_stop_command(absl::StrCat("pkill -f \"" , first_dag, "\"" )); module .mutable_process_monitor_config()->add_command_keywords("mainboard" ); module .mutable_process_monitor_config()->add_command_keywords(first_dag); } mode.clear_cyber_modules(); AINFO << "Loaded HMI mode: " << mode.DebugString(); return mode; }
HMIWorker::LoadMode 方法实现并不复杂,它读取模式配置文件,为每一个 cyber_modules 功能模组生成对应的启动命令 start_command,cyber_modules 中 value 项下的每一个 dag_files 对应启动命令中的一个 -d 选项,例如会为上面提到的 apollo/modules/dreamview/conf/hmi_modes/mkz_standard_debug.pb.txt 中的 Perception 模块字段生成下面的 start_command:
1 nohup mainboard -d /apollo/modules/perception/production/dag/dag_streaming_perception.dag &
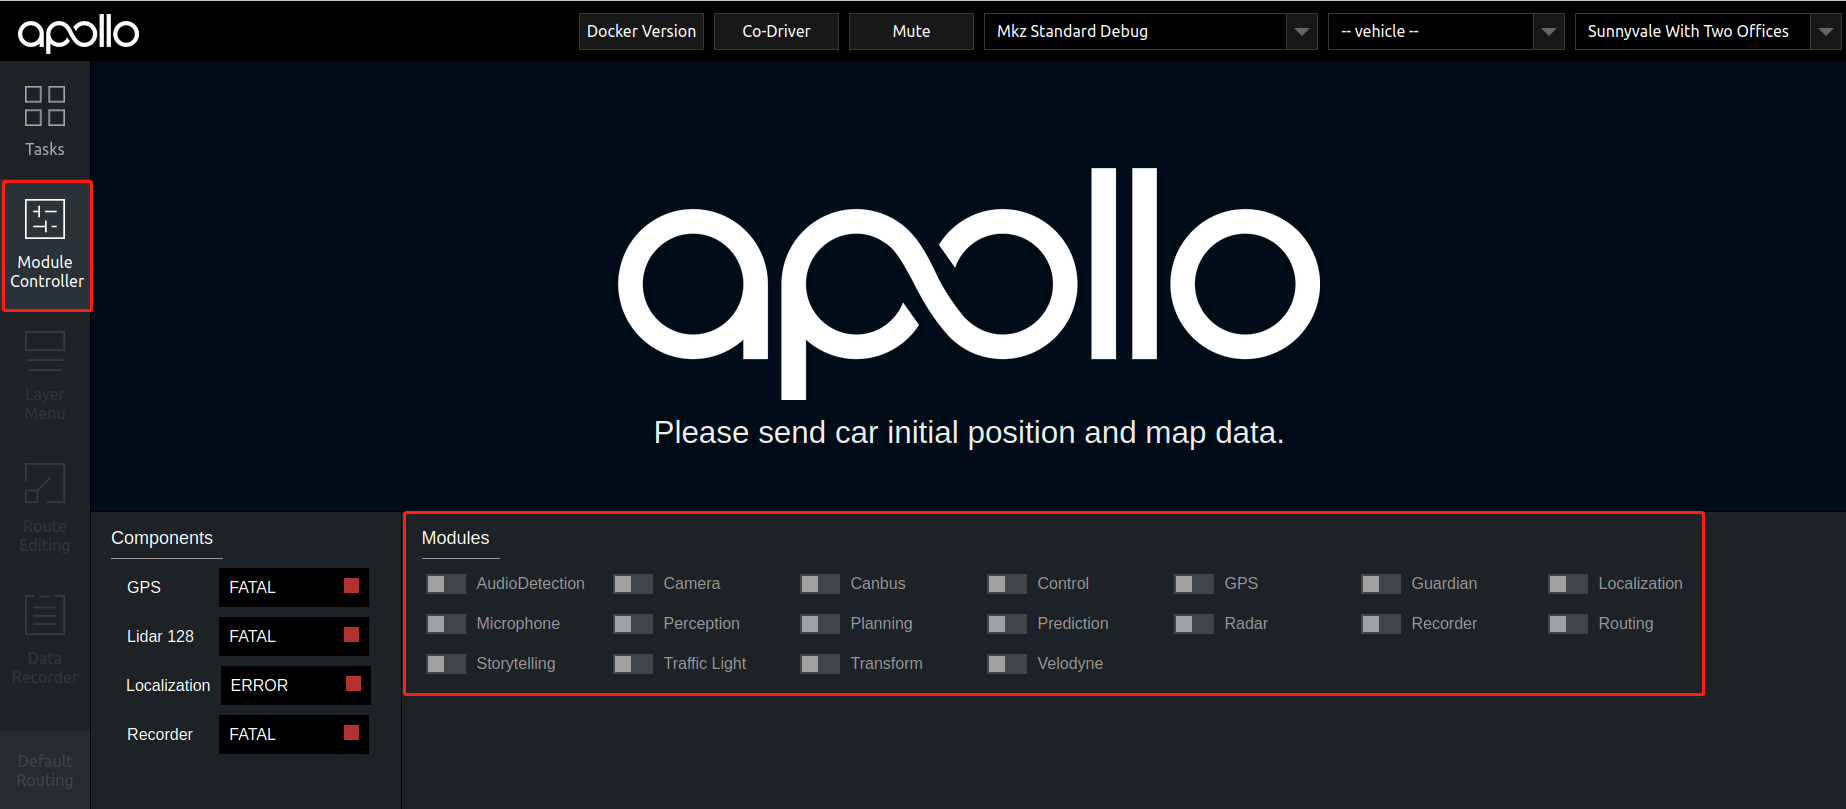
模式配置文件中所有的 cyber_modules 最终会显示在 DreamView 的 Module Controller 界面上:
2. 启动功能模块
通过 DreamView Module Controller 前端界面上的滑动按钮可以打开或关闭对应模块,当我们滑动某个模块的按钮至开启状态时,相应动作会通过 WebSocket 由前端传递至后端并触发执行 apollo/modules/dreamview/backend/hmi/hmi_worker.cc 中的 HMIWorker::StartModule 方法:
1
2
3
4
5
6
7
8
9
10
11
12
13
14
15
16
17
18
19
20
21
22
void HMIWorker::StartModule (const std ::string & module ) const const Module* module_conf = FindOrNull(current_mode_.modules(), module ); if (module_conf != nullptr ) { System(module_conf->start_command()); } else { AERROR << "Cannot find module " << module ; } if (module == "Recorder" ) { auto * monitors = FuelMonitorManager::Instance()->GetCurrentMonitors(); if (monitors != nullptr ) { auto iter = monitors->find(FLAGS_data_collection_monitor_name); if (iter != monitors->end()) { auto * data_collection_monitor = iter->second.get(); if (data_collection_monitor->IsEnabled() && record_count_ == 0 ) { data_collection_monitor->Restart(); } } ++record_count_; } } }
HMIWorker::StartModule 方法将来自前端的被触发模块的 start_command 传入 System 函数并执行:
1
2
3
4
5
6
7
8
void System (std ::string_view cmd) const int ret = std ::system(cmd.data()); if (ret == 0 ) { AINFO << "SUCCESS: " << cmd; } else { AERROR << "FAILED(" << ret << "): " << cmd; } }
System 函数最终会通过标准库函数 std::system 执行 start_command 中的命令行语句。至此,又回到了 2.1 章节中叙述的启动方式。
3 总结 概括全文,我们可以得到以下结论:
1) Cyber RT 被构建成名为 mainboard 的可执行文件,Perception 模块被构建成两个分别命名为 libperception_component_camera.so 和 libperception_component_lidar.so 的动态库文件,DreamView 模块被构建成名为 dreamview 的可执行文件;
2) 对于模块启动,可以使用 mainboard 直接从 DAG 文件启动,也可以使用 cyber_launch 脚本从 Launch 文件间接启动,或者通过 DreamView Module Controller 前端界面进行启动,后面两种方式根本上也是通过 mainboard 读入了相应 DAG 文件进行启动;
3) 使用 mainboard 从 DAG 文件启动相应功能模块时,主要发生了三件事:
加载子功能模块并注册其中的各个组件。 通过 ClassLoaderManager::LoadLibrary 函数间接调用 Linux 底层的 dlopen 函数来加载 DAG 文件中的各个子功能模块的 .so 动态库文件,每个子功能模块的组件注册过程随着模块 .so 动态库文件的加载一同进行,最终通过 CYBER_REGISTER_COMPONENT 宏来实现组件注册;实例化具体组件类。 在 factory_map 中查找各个具体组件类注册过程中生成的对应的类工厂对象,并通过该类工厂对象返回一个具体组件类的指针;初始化具体组件实例,进入组件内部算法流程。 每个具体组件类的 Init 方法会在 Component 类的 Initialize 方法中被多态调用一次,而每个具体组件类的 Proc 方法将成为对应 channel 上的消息回调函数,最终,每个组件会对应一个协程。
参考
CyberRT 介绍 Apollo 3.5 各功能模块的启动过程解析 apollo 介绍之 cyber 启动(十九)