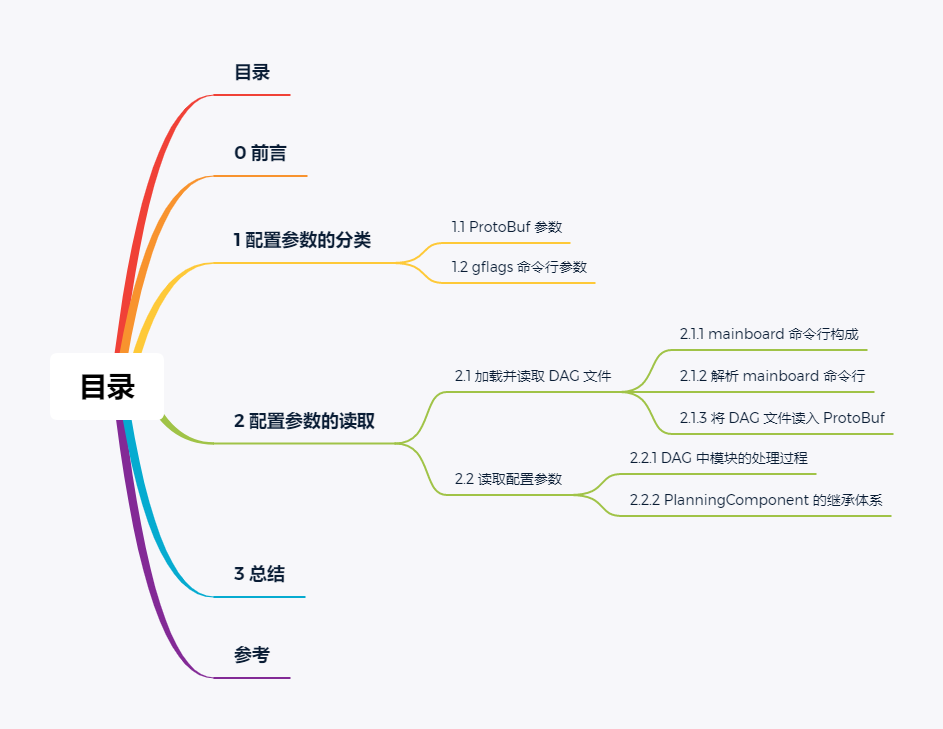
0%

Apollo 8.0 配置参数读取源码解析:以 Planning 模块为例

目录

目录-Apollo 8.0 配置参数读取源码解析:以 Planning 模块为例

0 前言

在此前的文章《Apollo 6.0 Perception 模块 Fusion 组件(一):构建与启动流程分析》中,我们以 Perception 模块 Fusion 组件为例分析了 Apollo 中功能模块的构建和启动过程,以及模块中各组件的注册、实例化、初始化和回调触发流程。作为对该文章内容的补充(强烈建议在阅读本文前先仔细阅读该文章),本文将在 Apollo 8.0 源码 master 分支上的 a3c851fc58 提交(2023 年 7 月 14 日提交)基础上,以 Planning 模块为例详细分析 Apollo 8.0 配置参数的读取过程。

1 配置参数的分类

通过《Apollo 6.0 Perception 模块 Fusion 组件(一):构建与启动流程分析》中的分析我们已经知道,Apollo Cyber RT 最终会被编译成名为 mainboard 的可执行文件,而各功能模块则会被编译为一个 .so 动态链接库,各功能模块的启动从根本上讲是通过 mainboard 读入相应的 DAG(Directed Acyclic Graph,有向无环图)文件并加载相应的动态链接库实现的。

我们看下 Planning 模块 DAG 文件 apollo/modules/planning/dag/planning.dag 中的内容:

1
2
3
4
5
6
7
8
9
10
11
12
13
14
15
16
17
18
19
20
21
22
23
24
25
26
27
28
29
30
31
# Define all coms in DAG streaming.
module_config {
module_library : "/apollo/bazel-bin/modules/planning/libplanning_component.so"
components {
class_name : "PlanningComponent"
config {
name: "planning"
config_file_path: "/apollo/modules/planning/conf/planning_config.pb.txt"
flag_file_path: "/apollo/modules/planning/conf/planning.conf"
readers: [
{
channel: "/apollo/prediction"
},
{
channel: "/apollo/canbus/chassis"
qos_profile: {
depth : 15
}
pending_queue_size: 50
},
{
channel: "/apollo/localization/pose"
qos_profile: {
depth : 15
}
pending_queue_size: 50
}
]
}
}
}

从该 DAG 文件中我们可以看到,Planning 模块对应的动态链接库为 apollo/bazel-bin/modules/planning/libplanning_component.so,Planning 模块只包含一个名为 PlanningComponent 的组件,module_config.components.config 指定了组件的配置参数,Apollo 模块组件的配置参数主要包括 ProtoBuf 参数和 gflags 命令行参数两类。

关于 gflags 的使用,可以预先阅读此前的文章《使用 gflags 进行 C++ 命令行参数处理》进行了解,该文章中包含了本文所涉及的关于 gflags 的必备知识。

1.1 ProtoBuf 参数

Apollo 使用 ProtoBuf 管理了大量详细的配置参数,由 DAG 文件中的 module_config.components.config.config_file_path 参数指定对应配置文件的绝对路径,文件中的配置参数将在组件初始化时被读入相应的 ProtoBuf 类型对象中。对于规划模块,ProtoBuf 参数的配置文件为 apollo/modules/planning/conf/planning_config.pb.txt,与之对应的 ProtoBuf 接口文件为 apollo/modules/planning/proto/planning_config.proto

1.2 gflags 命令行参数

Apollo 还使用 gflags 管理了命令行参数,由 DAG 文件中的 module_config.components.config.flag_file_path 参数指定对应配置文件的绝对路径,文件中的命令行参数也将在组件初始化时由 gflags 进行解析。对于规划模块,gflags 命令行参数配置文件为 apollo/modules/planning/conf/planning.conf

关于 ProtoBuf 参数和 gflags 命令行参数的读取过程,将在后文中进行剖析。

2 配置参数的读取

我们打开 mainboard 的主入口文件 apollo/cyber/mainboard/mainboard.cc,并看下入口函数 main

1
2
3
4
5
6
7
8
9
10
11
12
13
14
15
16
17
18
19
20
21
22
23
24
25
26
27
28
int main(int argc, char** argv) {
// parse the argument
// step 1:解析传给 mainboard 的命令行,并存储参数
ModuleArgument module_args;
module_args.ParseArgument(argc, argv);

// initialize cyber
// step 2:初始化 Cyber RT,argv[0] 代表的是当前可执行程序的名字,即 mainboard
apollo::cyber::Init(argv[0]);

// start module
// step 3:启动各模块
// step 3.1:使用 mainboard 命令行构造一个模块控制器对象
ModuleController controller(module_args);
// step 3.2:初始化模块控制器对象,模块的加载以及模块中各组件的注册、实例化、初始化都
// 在这里实现
if (!controller.Init()) {
controller.Clear();
AERROR << "module start error.";
return -1;
}

apollo::cyber::WaitForShutdown();
controller.Clear();
AINFO << "exit mainboard.";

return 0;
}

不难发现,该入口函数主要做了三件事:

  • step 1:解析传给 mainboard 的命令行
  • step 2:初始化 Cyber RT 中间件
  • step 3:启动各模块

为分析 Planning 模块配置参数的读取过程,这里我们只需关注步骤 1 和步骤 3。

2.1 加载并读取 DAG 文件

2.1.1 mainboard 命令行构成

ModuleArgument 定义于 apollo/cyber/mainboard/module_argument.h 中,用于存储传给 mainboard 的命令行中的参数:

1
2
3
4
5
6
7
8
9
class ModuleArgument {
// ......

private:
std::list<std::string> dag_conf_list_; // 传给 mainboard 的 DAG 文件列表
std::string binary_name_; // 可执行程序的名字,即 mainboard
std::string process_group_; // mainboard 进程所在的命名空间
std::string sched_name_; // mainboard 进程所使用的调度策略
};

ModuleArgument 包含四个私有数据成员,成员含义我们已经在上述代码中给出了注释。

《Apollo 6.0 Perception 模块 Fusion 组件(一):构建与启动流程分析》中我们已经知道,我们可以在 Apollo 源码仓库的根目录下执行下述命令来加载 DAG 文件并启动其中包含的子功能模块与组件:

1
mainboard -d modules/planning/dag/planning.dag

-d 选项后面跟的可以是 DAG 文件的文件名、相对路径或绝对路径。我们还可以像下面这样为 mainboard 传入多个 DAG 文件:

1
mainboard -d a.dag -d b.dag -d c.dag

上面这条语句等价于:

1
mainboard -d a.dag b.dag c.dag

mainboard 还有两个参数选项:

  • -p:进程所在命名空间(process proup)
  • -s:进程所使用的调度策略(schedule name)

下面这条 bash 语句完整地展示了 mainboard 所支持的主要命令行选项及参数:

1
mainboard -d a.dag b.dag c.dag -p process_proup -s sched_name

2.1.2 解析 mainboard 命令行

ModuleArgument::ParseArgument 是用于解析 mainboard 命令行的入口函数,定义于 apollo/cyber/mainboard/module_argument.cc 中:

1
2
3
4
5
6
void ModuleArgument::ParseArgument(const int argc, char* const argv[]) {
binary_name_ = std::string(basename(argv[0])); // mainboard
GetOptions(argc, argv); // 处理 mainboard 的命令行

// ......
}

ModuleArgument::ParseArgument 的功能逻辑主要由同样定义于 apollo/cyber/mainboard/module_argument.cc 中的 ModuleArgument::GetOptions 方法实现:

1
2
3
4
5
6
7
8
9
10
11
12
13
14
15
16
17
18
19
20
21
22
23
24
25
26
27
28
29
30
31
32
33
34
35
36
37
38
39
40
41
42
43
44
45
46
47
48
49
50
51
52
53
54
55
56
57
58
59
60
61
62
63
64
65
66
67
68
69
70
71
72
73
74
void ModuleArgument::GetOptions(const int argc, char* const argv[]) {
opterr = 0; // extern int opterr
int long_index = 0;
const std::string short_opts = "hd:p:s:";
static const struct option long_opts[] = {
{"help", no_argument, nullptr, 'h'},
{"dag_conf", required_argument, nullptr, 'd'},
{"process_name", required_argument, nullptr, 'p'},
{"sched_name", required_argument, nullptr, 's'},
{NULL, no_argument, nullptr, 0}};

// log command for info
std::string cmd("");
for (int i = 0; i < argc; ++i) {
cmd += argv[i];
cmd += " ";
}
AINFO << "command: " << cmd;

if (1 == argc) {
DisplayUsage();
exit(0);
}

// 使用 Linux 的 getopt_long 函数逐一处理 mainboard 的命令行选项,正常情况下该函数
// 返回当前的命令行选项
do {
int opt =
getopt_long(argc, argv, short_opts.c_str(), long_opts, &long_index);
if (opt == -1) {
break;
}
switch (opt) {
case 'd':
// optarg 指向当前命令行选项的第一个参数,若当前命令行选项无参数,optarg 为空
// 指针
dag_conf_list_.emplace_back(std::string(optarg));

// optind 是当前命令行选项的第一个参数的下一个相邻字符串(即下一个命令行选项或
// 当前命令行选项的第二个参数)在 argv 中的索引
for (int i = optind; i < argc; i++) {
if (*argv[i] != '-') {
dag_conf_list_.emplace_back(std::string(argv[i]));
} else {
break;
}
}
break;
case 'p':
process_group_ = std::string(optarg);
break;
case 's':
sched_name_ = std::string(optarg);
break;
case 'h':
DisplayUsage();
exit(0);
default:
break;
}
} while (true);

if (optind < argc) {
AINFO << "Found non-option ARGV-element \"" << argv[optind++] << "\"";
DisplayUsage();
exit(1);
}

if (dag_conf_list_.empty()) {
AINFO << "-d parameter must be specified";
DisplayUsage();
exit(1);
}
}

ModuleArgument::GetOptions 方法使用 Linux 的 getopt_long 函数逐一处理 mainboard 的命令行选项,关于 getopt_long 的使用可以查阅相关资料,此处我们不做展开。以上文中提到的下面这条 bash 语句为例:

1
mainboard -d a.dag b.dag c.dag -p process_proup -s sched_name

ModuleArgument::GetOptions 方法会将 a.dag b.dag c.dag 依次塞入 ModuleArgument::dag_conf_list_,并将 process_proupsched_name 分别赋值给 ModuleArgument::process_group_ModuleArgument::sched_name_,最终完成对 mainboard 命令行的解析。

2.1.3 将 DAG 文件读入 ProtoBuf

ModuleController 定义于 apollo/cyber/mainboard/module_controller.h 中,用于执行 DAG 文件读入和 DAG 文件中各模块的加载以及模块各组件的注册、实例化、初始化等操作:

1
2
3
4
5
6
7
8
9
10
11
12
13
14
15
16
17
18
19
20
21
22
23
24
25
class ModuleController {
public:
explicit ModuleController(const ModuleArgument& args);
virtual ~ModuleController() = default;

bool Init(); // 主入口函数
bool LoadAll();
void Clear();

private:
bool LoadModule(const std::string& path);
bool LoadModule(const DagConfig& dag_config);
int GetComponentNum(const std::string& path);
int total_component_nums = 0; // 所有 DAG 文件所包含的组件总数
bool has_timer_component = false; // 是否含有时间触发组件

// 已经解析好的 mainboard 命令行选项参数
ModuleArgument args_;

// 类加载器管理器,用于执行加载/卸载模块动态链接库、创建模块组件对象等操作
class_loader::ClassLoaderManager class_loader_manager_;

// 组件列表,包含了所有 DAG 文件所包含的所有组件
std::vector<std::shared_ptr<ComponentBase>> component_list_;
};

ModuleController 只有一个接受 ModuleArgument 类型参数的构造函数:

1
2
inline ModuleController::ModuleController(const ModuleArgument& args)
: args_(args) {}

完成 ModuleController 对象的构造后,需要调用 ModuleController::Init() 方法进入模块控制逻辑的主流程:

1
inline bool ModuleController::Init() { return LoadAll(); }

ModuleController::Init() 内部只执行了对 ModuleController::LoadAll 方法的调用:

1
2
3
4
5
6
7
8
9
10
11
12
13
14
15
16
17
18
19
20
21
22
23
24
25
26
27
28
29
30
31
32
33
34
35
36
37
38
39
40
bool ModuleController::LoadAll() {
const std::string work_root = common::WorkRoot();
const std::string current_path = common::GetCurrentPath();
const std::string dag_root_path = common::GetAbsolutePath(work_root, "dag");
std::vector<std::string> paths; // 存储所有 DAG 文件的绝对路径
// 逐一获取传给 mainboard 的每个 DAG 文件的绝对路径,并汇总到 paths 中
for (auto& dag_conf : args_.GetDAGConfList()) {
std::string module_path = ""; // 存储当前 DAG 文件的绝对路径
if (dag_conf == common::GetFileName(dag_conf)) {
// case dag conf argument var is a filename
module_path = common::GetAbsolutePath(dag_root_path, dag_conf);
} else if (dag_conf[0] == '/') {
// case dag conf argument var is an absolute path
module_path = dag_conf;
} else {
// case dag conf argument var is a relative path
module_path = common::GetAbsolutePath(current_path, dag_conf);
if (!common::PathExists(module_path)) {
module_path = common::GetAbsolutePath(work_root, dag_conf);
}
}
total_component_nums += GetComponentNum(module_path);
// 将每个 DAG 文件的绝对路径插入到 paths 中
paths.emplace_back(std::move(module_path));
}
if (has_timer_component) {
total_component_nums += scheduler::Instance()->TaskPoolSize();
}
common::GlobalData::Instance()->SetComponentNums(total_component_nums);
// 逐一加载每个 DAG 文件
for (auto module_path : paths) {
AINFO << "Start initialize dag: " << module_path;
// 调用 LoadModule(接受 const std::string& 类型参数的重载版本)处理 DAG 文件
if (!LoadModule(module_path)) {
AERROR << "Failed to load module: " << module_path;
return false;
}
}
return true;
}

ModuleController::LoadAll 方法获取了传给 mainboard 的每个 DAG 文件的绝对路径,并调用 ModuleController::LoadModule(接受 const std::string& 类型参数的重载版本)进行处理:

1
2
3
4
5
6
7
8
9
10
11
bool ModuleController::LoadModule(const std::string& path) {
DagConfig dag_config; // a. 定义 DAG 文件的 ProtoBuf 对象
// b. 将 DAG 文件读入 ProtoBuf 对象
if (!common::GetProtoFromFile(path, &dag_config)) {
AERROR << "Get proto failed, file: " << path;
return false;
}
// c. 调用 LoadModule(接受 const DagConfig& 类型参数的重载版本)处理 DAG 文件
// ProtoBuf 对象
return LoadModule(dag_config);
}

该版本的 ModuleController::LoadModule 方法做了三件事:

a. 定义 DagConfig 类型的对象

DagConfig 是定义在 apollo/cyber/proto/dag_conf.proto 中的 ProtoBuf 数据类型,包含了 DAG 文件中的各个关键字段:

1
2
3
4
5
6
7
8
9
10
11
12
13
14
15
16
17
18
19
20
21
22
23
24
25
syntax = "proto2";

package apollo.cyber.proto;

import "cyber/proto/component_conf.proto";

message ComponentInfo {
optional string class_name = 1;
optional ComponentConfig config = 2;
}

message TimerComponentInfo {
optional string class_name = 1;
optional TimerComponentConfig config = 2;
}

message ModuleConfig {
optional string module_library = 1;
repeated ComponentInfo components = 2;
repeated TimerComponentInfo timer_components = 3;
}

message DagConfig {
repeated ModuleConfig module_config = 1;
}

其中的组件配置参数字段 ComponentConfigTimerComponentConfig 嵌套依赖了 apollo/cyber/proto/component_conf.proto

1
2
3
4
5
6
7
8
9
10
11
12
13
14
15
16
17
18
19
20
21
22
23
24
25
26
27
syntax = "proto2";

package apollo.cyber.proto;

import "cyber/proto/qos_profile.proto";

message ReaderOption {
optional string channel = 1;
optional QosProfile qos_profile =
2; // depth: used to define capacity of processed messages
optional uint32 pending_queue_size = 3
[default = 1]; // used to define capacity of unprocessed messages
}

message ComponentConfig {
optional string name = 1;
optional string config_file_path = 2;
optional string flag_file_path = 3;
repeated ReaderOption readers = 4;
}

message TimerComponentConfig {
optional string name = 1;
optional string config_file_path = 2;
optional string flag_file_path = 3;
optional uint32 interval = 4; // In milliseconds.
}

显而易见:

  • ComponentConfig.config_file_path 代表 ProtoBuf 参数配置文件的路径,与 DAG 文件中的 module_config.components.config.config_file_path 参数相对应
  • ComponentConfig.flag_file_path 代表 gflags 命令行参数配置文件的路径,与 DAG 文件中的 module_config.components.config.flag_file_path 参数相对应

b. 将 DAG 文件读入 DagConfig ProtoBuf 对象

将 DAG 文件的内容读入 DagConfig ProtoBuf 对象的操作是通过 common::GetProtoFromFile 函数实现的,这是一个定义于 apollo/cyber/common/file.cc 中的通用工具函数,专门用于将普通文件中的结构化内容读入到预定义的 ProtoBuf 对象中,其实现细节我们此处不做展开。

c. 模块的加载以及模块各组件的注册、实例化、初始化

模块的加载以及模块中各组件的注册、实例化、初始化是通过调用接受 DagConfig 类型参数的 ModuleController::LoadModule 方法间接实现的,组件初始化的过程中完成了组件 Protobuf 参数和 gflags 命令行参数的读取,具体细节将在下文中进行分析。

2.2 读取配置参数

2.2.1 DAG 中模块的处理过程

我们看下接受 DagConfig 类型参数的 ModuleController::LoadModule 方法的具体实现:

1
2
3
4
5
6
7
8
9
10
11
12
13
14
15
16
17
18
19
20
21
22
23
24
25
26
27
28
29
30
31
32
33
34
35
36
37
38
39
40
41
42
43
44
45
46
47
48
49
50
51
52
53
54
bool ModuleController::LoadModule(const DagConfig& dag_config) {
const std::string work_root = common::WorkRoot();

// 逐一处理 DAG 中的各个模块
for (auto module_config : dag_config.module_config()) {
std::string load_path; // 用于存储模块动态链接库的绝对路径
if (module_config.module_library().front() == '/') {
load_path = module_config.module_library();
} else {
load_path =
common::GetAbsolutePath(work_root, module_config.module_library());
}

if (!common::PathExists(load_path)) {
AERROR << "Path does not exist: " << load_path;
return false;
}

// step 1:加载模块动态链接库,完成模块各组件的注册
class_loader_manager_.LoadLibrary(load_path);

// step 2:逐一处理模块的各个一般组件,Planning 模块只有一个名为
// PlanningComponent 的组件
for (auto& component : module_config.components()) {
// 组件名,对于 Planning 模块,即 PlanningComponent
const std::string& class_name = component.class_name();

// step 2.1:创建具体组件类的对象指针,并动态绑定到组件基类的对象指针 base 上
std::shared_ptr<ComponentBase> base =
class_loader_manager_.CreateClassObj<ComponentBase>(class_name);

// step 2.2:执行组件的泛化初始化流程 Initialize,组件配置参数的读取最终在这里
// 完成,其实参 component.config 即 DAG 文件 ProtoBuf 对象中的组件配置项,包含
// 了前文中提到的 ProtoBuf 参数配置文件路径 config_file_path 和 gflags 命令行
// 参数配置文件路径 flag_file_path
if (base == nullptr || !base->Initialize(component.config())) {
return false;
}
component_list_.emplace_back(std::move(base));
}

// step 3:逐一处理模块的各个时间触发组件,Planning 模块没有时间触发组件
for (auto& component : module_config.timer_components()) {
const std::string& class_name = component.class_name();
std::shared_ptr<ComponentBase> base =
class_loader_manager_.CreateClassObj<ComponentBase>(class_name);
if (base == nullptr || !base->Initialize(component.config())) {
return false;
}
component_list_.emplace_back(std::move(base));
}
}
return true;
}

该方法逐一处理 DAG 中的各个模块(一个 DAG 中可能有多个模块),每个模块的处理过程包含了三个步骤,其中步骤 2 又包含了两个子步骤:

  • step 1:加载模块动态链接库,完成模块各组件的注册
  • step 2:逐一处理模块的各个一般组件
    • step 2.1:创建具体组件类的对象指针,并动态绑定到组件基类的对象指针 base
    • step 2.2:执行组件的泛化初始化流程 Initialize
  • step 3:逐一处理模块的各个时间触发组件

组件配置参数的读取最终在步骤 2.2 中完成,所以这里我们只针对该步骤进行展开分析,至于模块的加载以及模块中各组件的注册、实例化等的细节可参考《Apollo 6.0 Perception 模块 Fusion 组件(一):构建与启动流程分析》的相应章节。

2.2.2 PlanningComponent 的继承体系

前文中已经提到,Planning 模块只包含一个名为 PlanningComponent 的组件,该组件的入口类是定义于 apollo/modules/planning/planning_component.h 中的 PlanningComponentPlanningComponent 继承了定义于 apollo/cyber/component/component.h 中的接受三个消息参数的模板类 Component<M0, M1, M2, NullType>Component<M0, M1, M2, NullType> 最终继承了定义于 apollo/cyber/component/component_base.h 中的 ComponentBasePlanningComponent 的继承体系如下图所示:

PlanningComponent 的继承体系

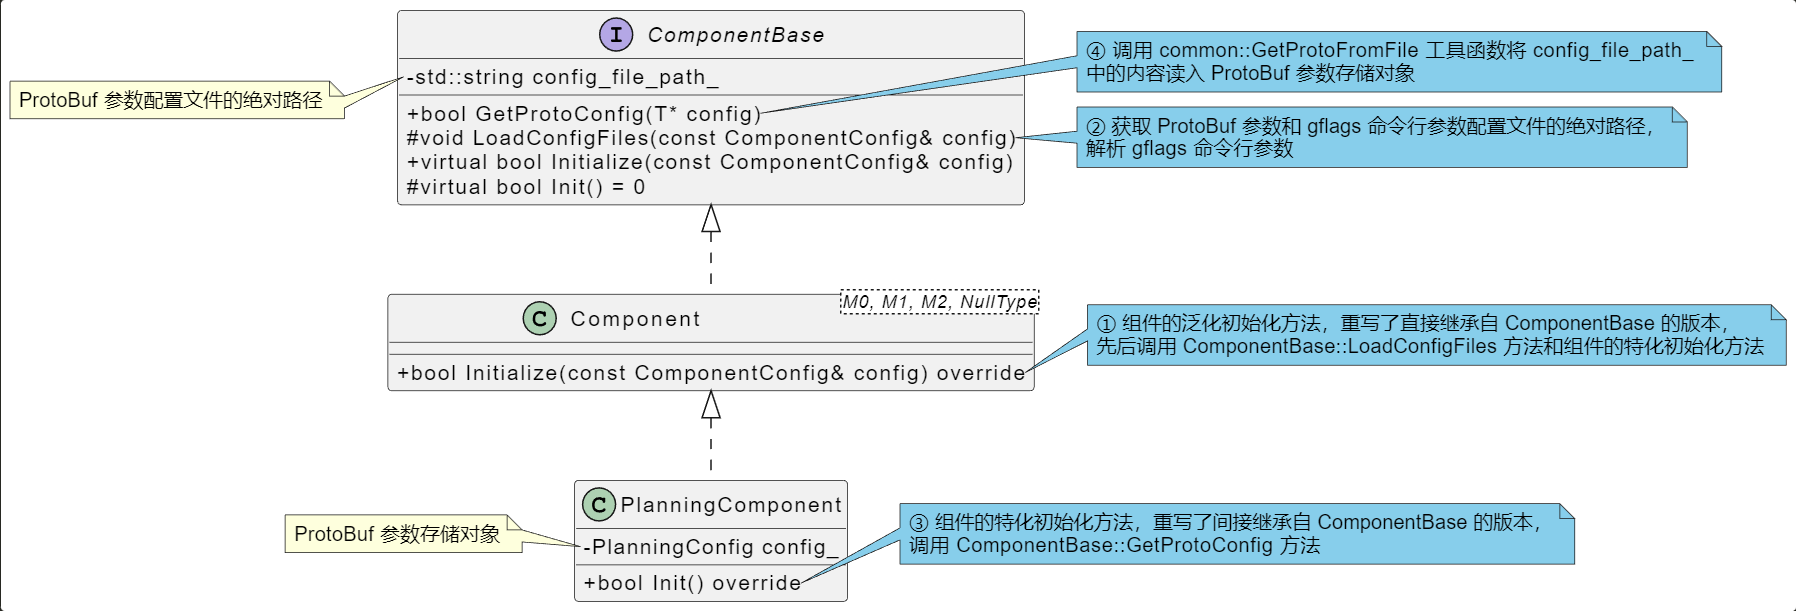
结合 PlanningComponent 的继承体系以及相应代码实现,我们看下 ProtoBuf 参数和 gflags 命令行参数最终是如何被读取的。

① Component::Initialize

Component<M0, M1, M2, NullType>::Initialize 即我们在上文中提到的组件的泛化初始化流程,它定义于 apollo/cyber/component/component.h 中:

1
2
3
4
5
6
7
8
9
10
11
12
13
14
15
16
17
18
19
template <typename M0, typename M1, typename M2>
bool Component<M0, M1, M2, NullType>::Initialize(
const ComponentConfig& config) {
node_.reset(new Node(config.name()));
LoadConfigFiles(config); // 加载 DAG 文件 ProtoBuf 对象中的组件配置项

if (config.readers_size() < 3) {
AERROR << "Invalid config file: too few readers.";
return false;
}

// 组件初始化
if (!Init()) {
AERROR << "Component Init() failed.";
return false;
}

// ......
}

其形参 const ComponentConfig& config 代表 DAG 文件 ProtoBuf 对象中的组件配置项,包含了前文中提到的 ProtoBuf 参数配置文件路径 config_file_path 和 gflags 命令行参数配置文件路径 flag_file_path。可以看到,Component<M0, M1, M2, NullType>::Initialize 内部先后调用了 ComponentBase::LoadConfigFiles 方法和 PlanningComponent::Init 方法。

② ComponentBase::LoadConfigFiles

ComponentBase::LoadConfigFiles 定义于 apollo/cyber/component/component_base.h 中:

1
2
3
4
5
6
7
8
9
10
11
12
13
14
15
16
17
18
19
20
21
void LoadConfigFiles(const ComponentConfig& config) {
// 获取 ProtoBuf 参数配置文件绝对路径
if (!config.config_file_path().empty()) {
if (config.config_file_path()[0] != '/') {
config_file_path_ = common::GetAbsolutePath(common::WorkRoot(),
config.config_file_path());
} else {
config_file_path_ = config.config_file_path();
}
}

// 获取 gflags 命令行参数配置文件绝对路径,并读取其中的命令行参数
if (!config.flag_file_path().empty()) {
std::string flag_file_path = config.flag_file_path();
if (flag_file_path[0] != '/') {
flag_file_path =
common::GetAbsolutePath(common::WorkRoot(), flag_file_path);
}
google::SetCommandLineOption("flagfile", flag_file_path.c_str());
}
}

该方法做了两件事:

  • 获取 ProtoBuf 参数配置文件的绝对路径
  • 获取 gflags 命令行参数配置文件的绝对路径,并通过 gflags 的 google::SetCommandLineOption 函数读取其中的命令行参数

③ PlanningComponent::Init

PlanningComponent::Init 定义于 apollo/modules/planning/planning_component.cc 中:

1
2
3
4
5
6
7
8
9
bool PlanningComponent::Init() {
// ......

ACHECK(ComponentBase::GetProtoConfig(&config_))
<< "failed to load planning config file "
<< ComponentBase::ConfigFilePath();

// ......
}

PlanningComponent::config_ 是一个 PlanningConfig 类型的 ProtoBuf 对象,用于存储从配置文件中读取到的组件 ProtoBuf 参数,PlanningConfig 类型定义于 apollo/modules/planning/proto/planning_config.proto 中。PlanningComponent::Init 通过调用 ComponentBase::GetProtoConfig 进行 ProtoBuf 参数的读取。

④ ComponentBase::GetProtoConfig

ComponentBase::GetProtoConfig 定义于 apollo/cyber/component/component_base.h 中:

1
2
3
4
template <typename T>
bool GetProtoConfig(T* config) const {
return common::GetProtoFromFile(config_file_path_, config);
}

ComponentBase::config_file_path_ 是 ProtoBuf 参数配置文件的绝对路径(已经在 ComponentBase::LoadConfigFiles 中更新)。可以看到,最终通过调用 common::GetProtoFromFile 工具函数将 ComponentBase::config_file_path_
中的内容读入了 ProtoBuf 参数存储对象(即上文中提到的 PlanningComponent::config_),关于 common::GetProtoFromFile 函数的实现细节我们不做展开。

3 总结

本文以 Planning 模块为例,详细分析了 Apollo 8.0 配置参数的读取过程,下面的时序图清晰地展示了完整流程:

PlanningComponent 参数读取时序图

下面我们对本文内容做如下五点总结:

  • 1) Apollo Cyber RT 被编译成名为 mainboard 的可执行文件,Planning 模块被编译成名为 libplanning_component.so 的动态链接库,模块的启动从根本上讲是通过 mainboard 读入相应的 DAG 文件并加载相应的动态链接库实现的,Planning 模块的 DAG 文件是 apollo/modules/planning/dag/planning.dag
  • 2) Apollo 模块组件的配置参数主要包括 ProtoBuf 参数和 gflags 命令行参数两类,DAG 文件中的 module_config.components.config.config_file_path 参数和 module_config.components.config.flag_file_path 分别指定了 ProtoBuf 参数和 gflags 命令行参数配置文件的绝对路径;
  • 3) mainboard 使用 Linux 的 getopt_long 函数解析命令行,并通过 common::GetProtoFromFile 工具函数将 DAG 文件读入 DagConfig ProtoBuf 对象;
  • 4) Apollo 模块的加载以及模块中各组件的注册、实例化、初始化是通过调用接受 DagConfig 类型参数的 ModuleController::LoadModule 方法间接实现的,这里的初始化指的是组件的泛化初始化流程 Initialize,具体执行哪个版本的 Initialize 取决于组件入口类的继承体系;
  • 5) Planning 模块只包含一个名为 PlanningComponent 的组件,对应的入口类即同名的 PlanningComponentPlanningComponent 直接继承了 Component<M0, M1, M2, NullType>,间接继承了 ComponentBase,所以 PlanningComponent 组件的泛化初始化调用的是 Component<M0, M1, M2, NullType>::Initialize,该方法最终通过调用 ComponentBase::LoadConfigFiles 方法和 PlanningComponent::Init 方法先后完成了组件 gflags 命令行参数和 ProtoBuf 参数的读取。

参考

  1. Apollo 6.0 Perception 模块 Fusion 组件(一):构建与启动流程分析
  2. 使用 gflags 进行 C++ 命令行参数处理

Thank you for your donate!